Executors
Introduction
To be able to use the power of the OpenAEV platform on endpoints, you need at least one neutral executor that will be in charge of executing implants as detached processes. Implants will then execute threat arsenal actions.
The platform manages different executors which can be installed on Windows, Linux and MacOS using x86_64 or arm64 architectures. This table below summarizes the information about each agent.
| Executor | Type | Installation mode | Installation type | Run As | Threat arsenal action execution | Multi agents for an endpoint |
|---|---|---|---|---|---|---|
| OpenAEV Agent (native/default) | Open source | Windows/Linux: user session, user service or system service macOS (temporary): system service only |
Script | A standard or admin background process | As a user standard, user admin or system admin | Yes, depending on the user and installation mode |
| Tanium Agent | Under license | As a system service | Executable | An admin background process | As a system admin | No, always the same agent |
| CrowdStrike Falcon Agent | Under license | As a system service | Executable | An admin background process | As a system admin | No, always the same agent |
| SentinelOne Agent | Under license | As a system service | Executable | An admin background process | As a system admin | No, always the same agent |
| Palo Alto Cortex Agent | Under license | As a system service | Executable | An admin background process | As a system admin | No, always the same agent |
| Microsoft Defender for Endpoint (MDE) Agent | Under license | Leverages the existing MDE sensor (Live Response) | Executable | An admin background process (SYSTEM) | As a system admin | No, always the same agent |
| Caldera Agent | Open source | As a user session | Script | An admin background process | As a user admin | Yes, depending on the user |
OpenAEV Agent
The OpenAEV agent is available for Windows, Linux and MacOS, it is the native / default way to execute implants and threat arsenal actions on endpoints.
Tanium Agent
The Tanium agent can be leveraged to execute implants as detached processes that will then execute threat arsenal actions, according to the OpenAEV architecture.
Configure the Tanium Platform
We provide two Tanium packages to be imported into the Tanium platform.

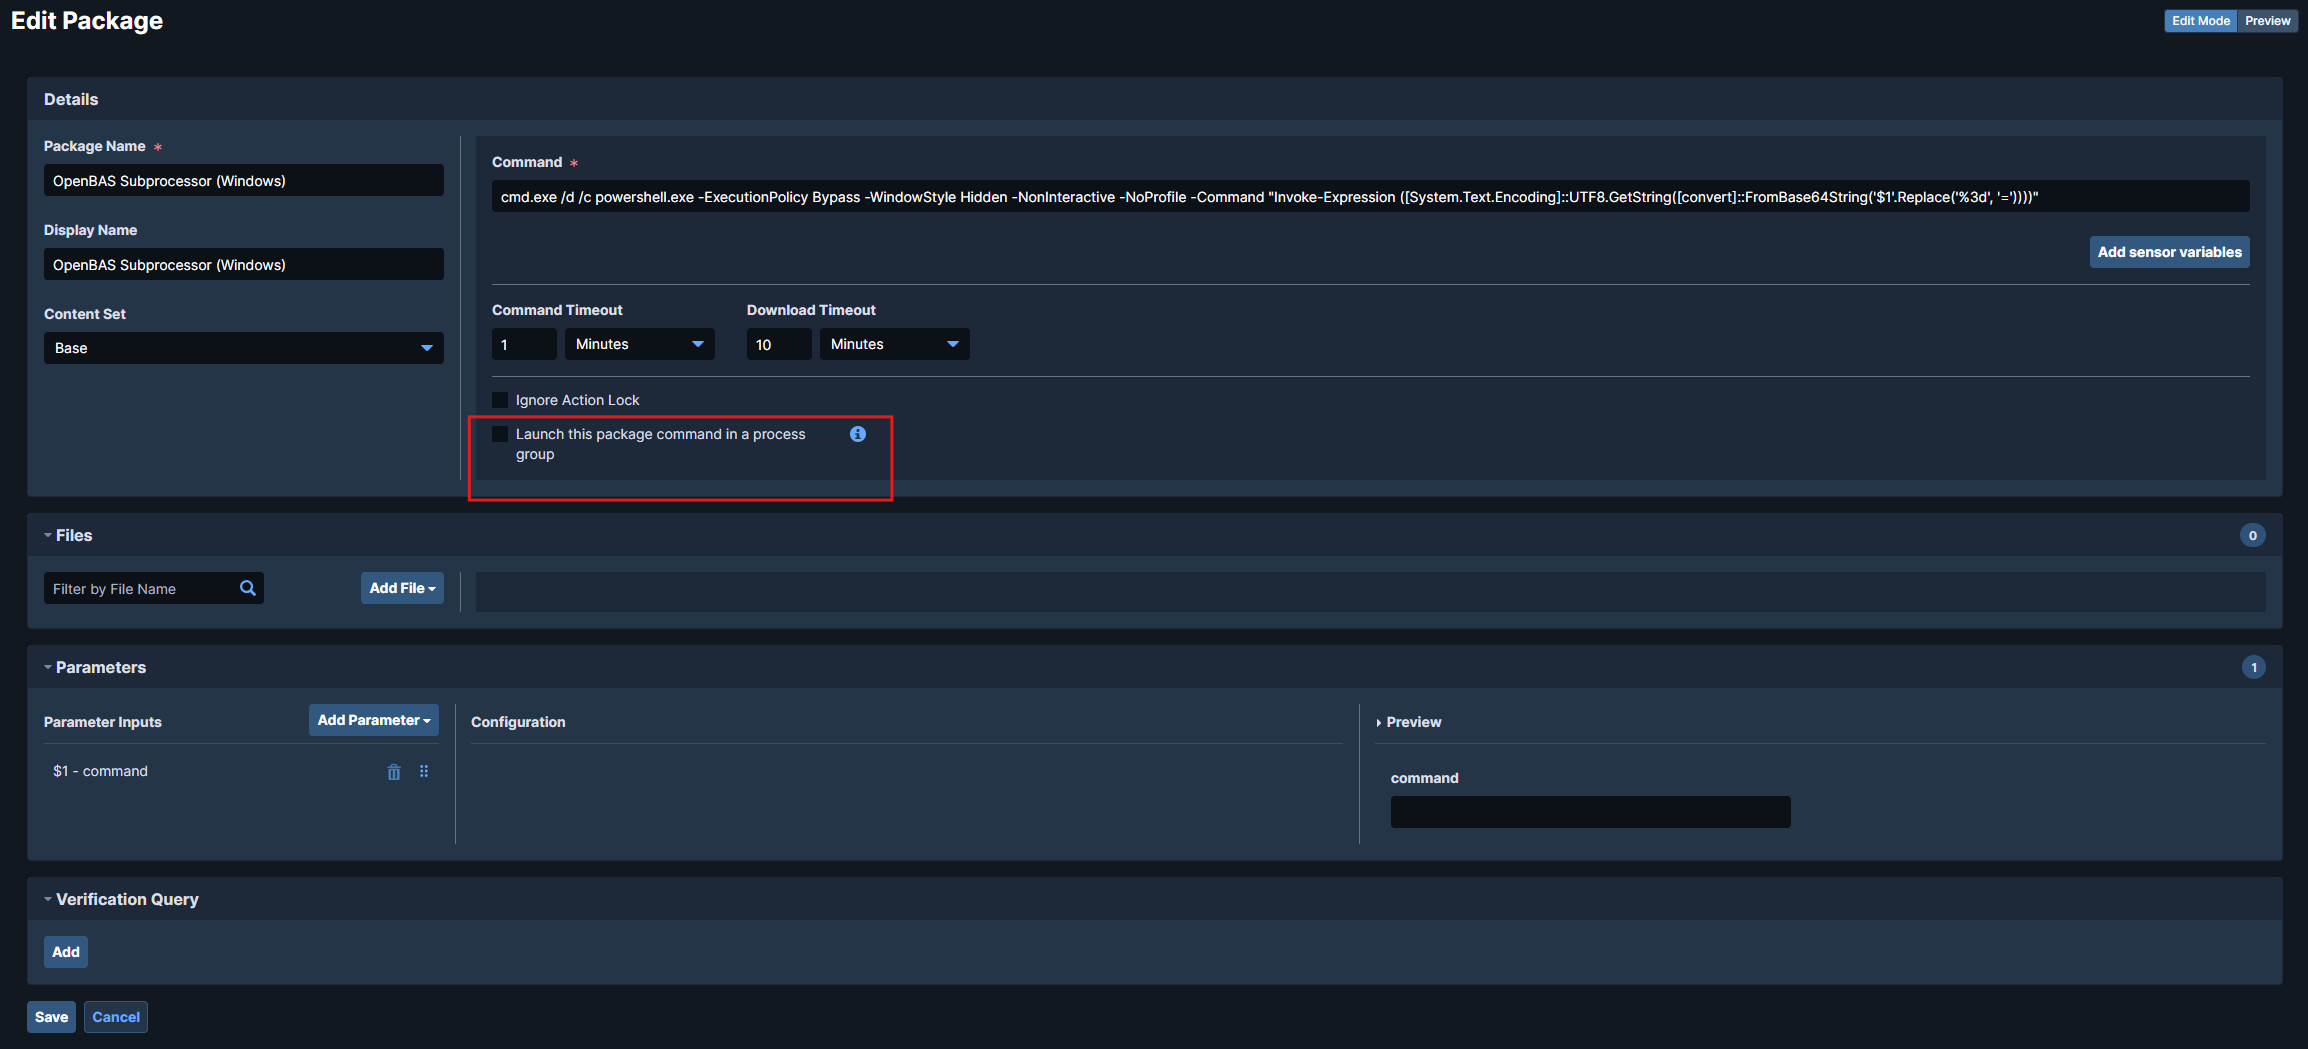
Tanium package configuration
Because OpenAEV should run implants as detached processes, you must uncheck
"Launch this package command in a process group" in the package configuration:
Tanium Threat Response usage
If your environment uses Tanium Threat Response (TTR) together with the Tanium agent, you should rely on the dedicated TTR package.
This package technically works in all cases, but it is only recommended when OpenAEV runs on endpoints with TTR enabled.
Reason: this package performs more extensive operations on the machine and can generate more noise and alerts.
→ If you do not use Tanium Threat Response, prefer the standard Tanium package.
📦 Packages to import:
- OpenAEV Tanium Windows & Unix package (TTR)
📜 Scripts to attach in the package configuration into files section:
- Windows TTR script
- Linux & macOS TTR script
| Package type | Recommended use case | Characteristics |
|---|---|---|
| Standard Tanium package | Default use with Tanium agent only | Lightweight, minimal impact, recommended in most scenarios |
| TTR package | Tanium agent + Tanium Threat Response | Enables additional operations, may generate more noise |
Once configured and imported, retrieve the package IDs from the URL:
ui/console/packages/XXXXX/preview.
ℹ️ Common group IDs in Tanium:
- Computer Group ID: identifies which endpoints will be queried.
- Action Group ID: identifies where actions (like package execution) are allowed.
Configure the OpenAEV Platform
To configure the Tanium executor, navigate to the Integrations > Executors section in the OpenAEV menu and fill in the Tanium integration settings directly from the UI.
Tanium API Key
The Tanium API key must have permissions to:
- Retrieve the endpoint list from the Tanium GraphQL API
- Launch packages on endpoints
Migrating from environment variables
If you previously configured this executor using environment variables or platform properties, these values have been automatically migrated to the database on first startup. After migration, changes to environment variables or properties are no longer taken into account — all configuration is now managed through the UI.
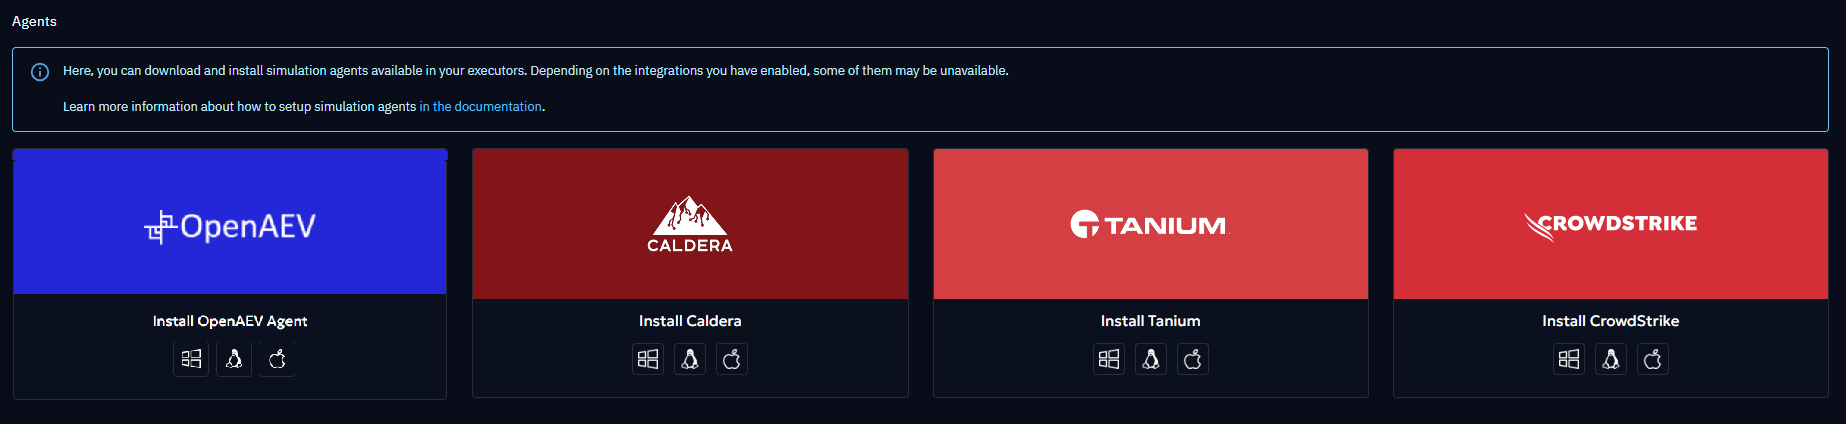
Checks
Once enabled, you should see Tanium available in the Install agents section:
Endpoints from the selected computer groups should now appear in the OpenAEV Endpoints section:

Agent uniqueness
An endpoint can only have one Tanium agent registered due to MAC address uniqueness.
Installing a new agent will overwrite the existing one, and you will always see a single endpoint in the OpenAEV console.
Installation done
You are now ready to leverage your Tanium platform to run OpenAEV threat arsenal actions!
CrowdStrike Falcon Agent
The CrowdStrike Falcon agent can be leveraged to execute implants as detached processes that will then execute threat arsenal actions according to the OpenAEV architecture.
Configure the CrowdStrike Platform
Upload OpenAEV scripts
First of all, you need to create two custom scripts, one for Windows and one for Unix, covering both Linux and MacOS systems.
To create it, go to Host setup and management > Response and containment > Response scripts and files. The names
of the scripts can be changed if necessary, they will be put in the OpenAEV configuration.
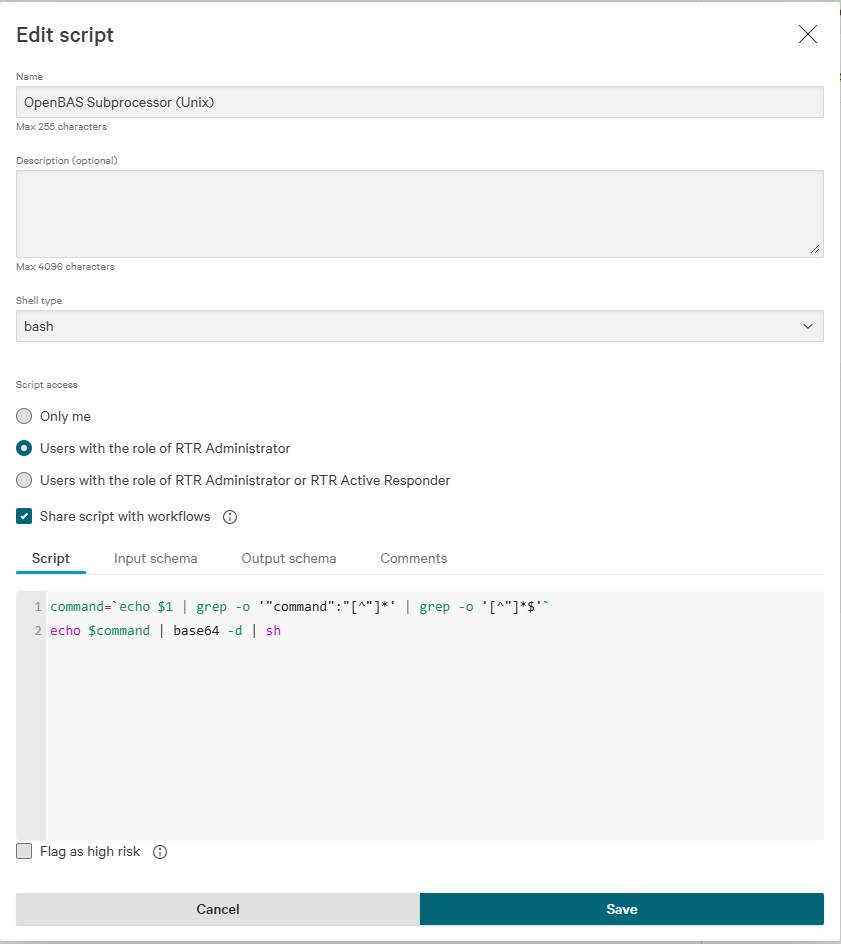
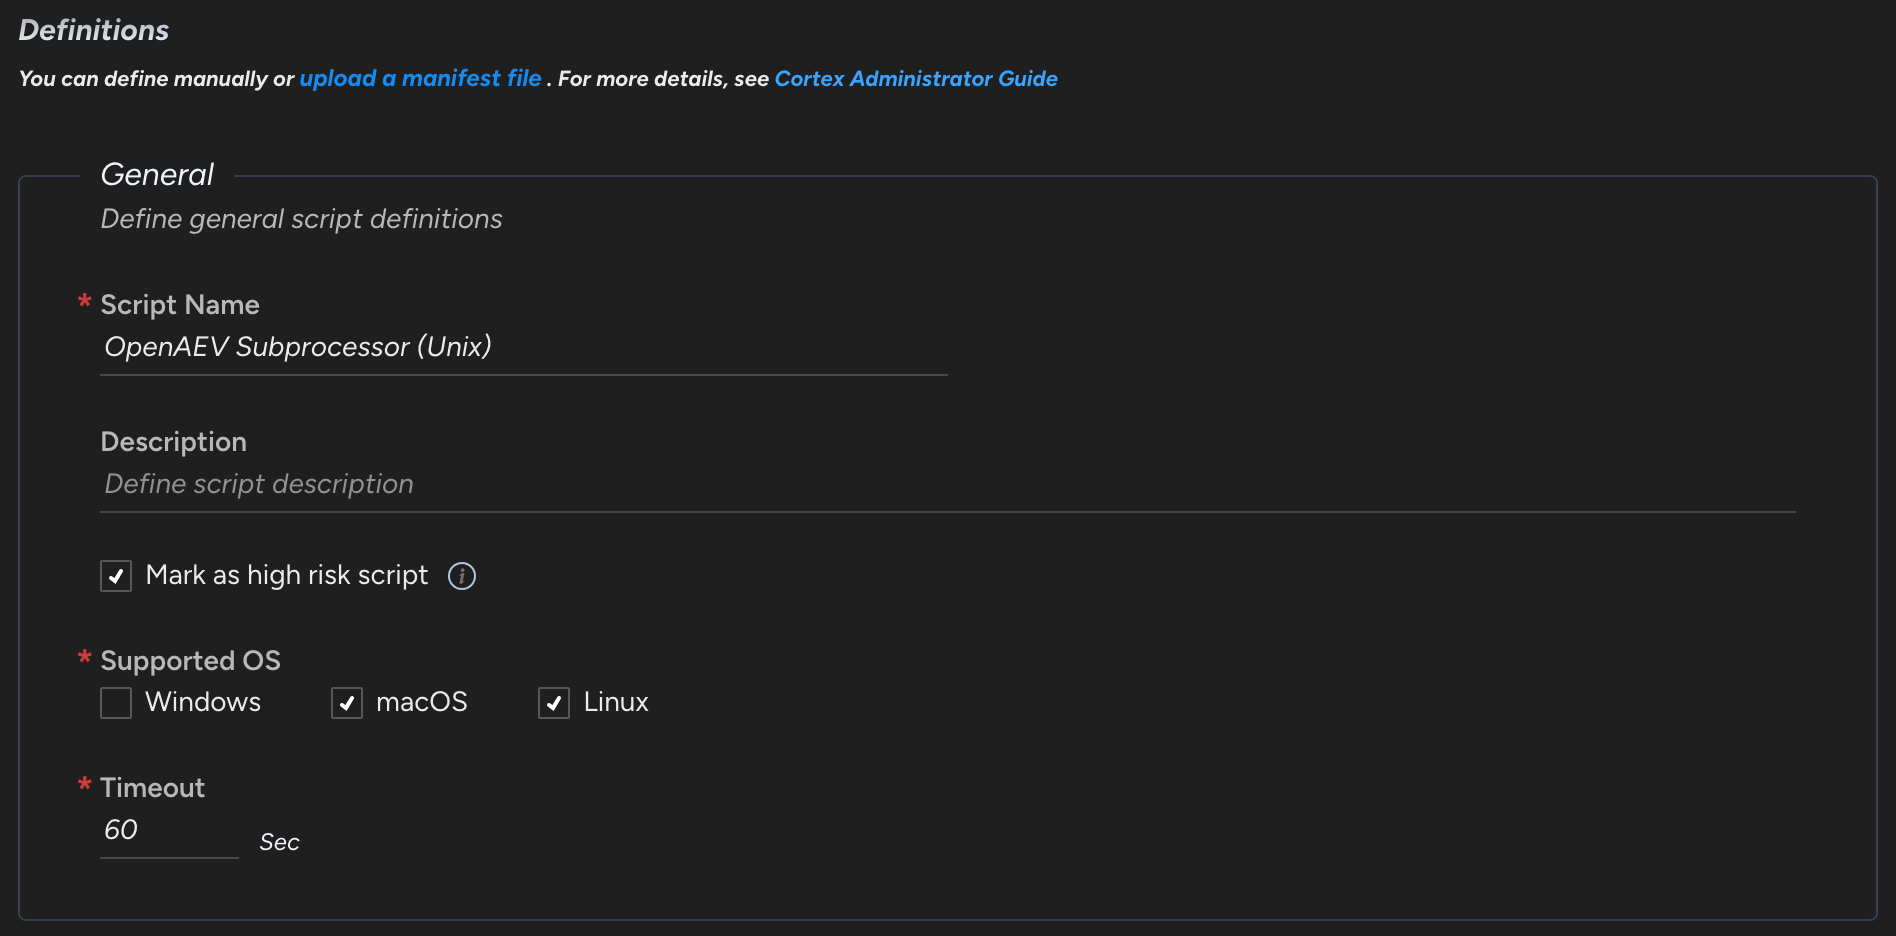
Unix Script
| Attribute | Value |
|---|---|
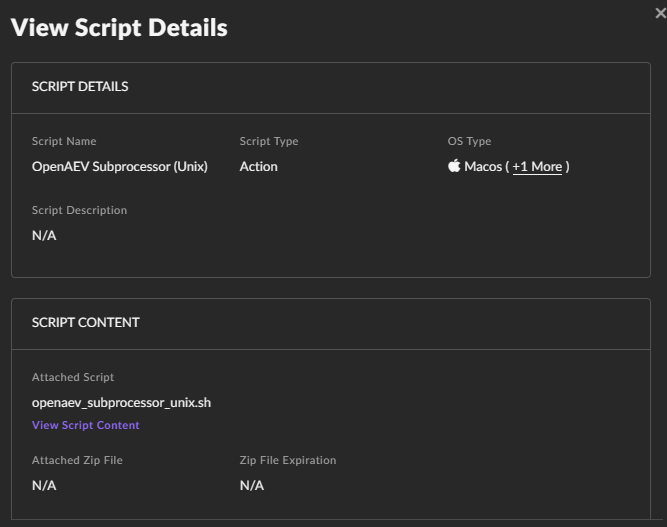
| name | OpenAEV Subprocessor (Unix) |
| shell type | bash |
| script access | Users with the role of RTR Administrator or RTR Active Responder |
| shared with workflows | yes |
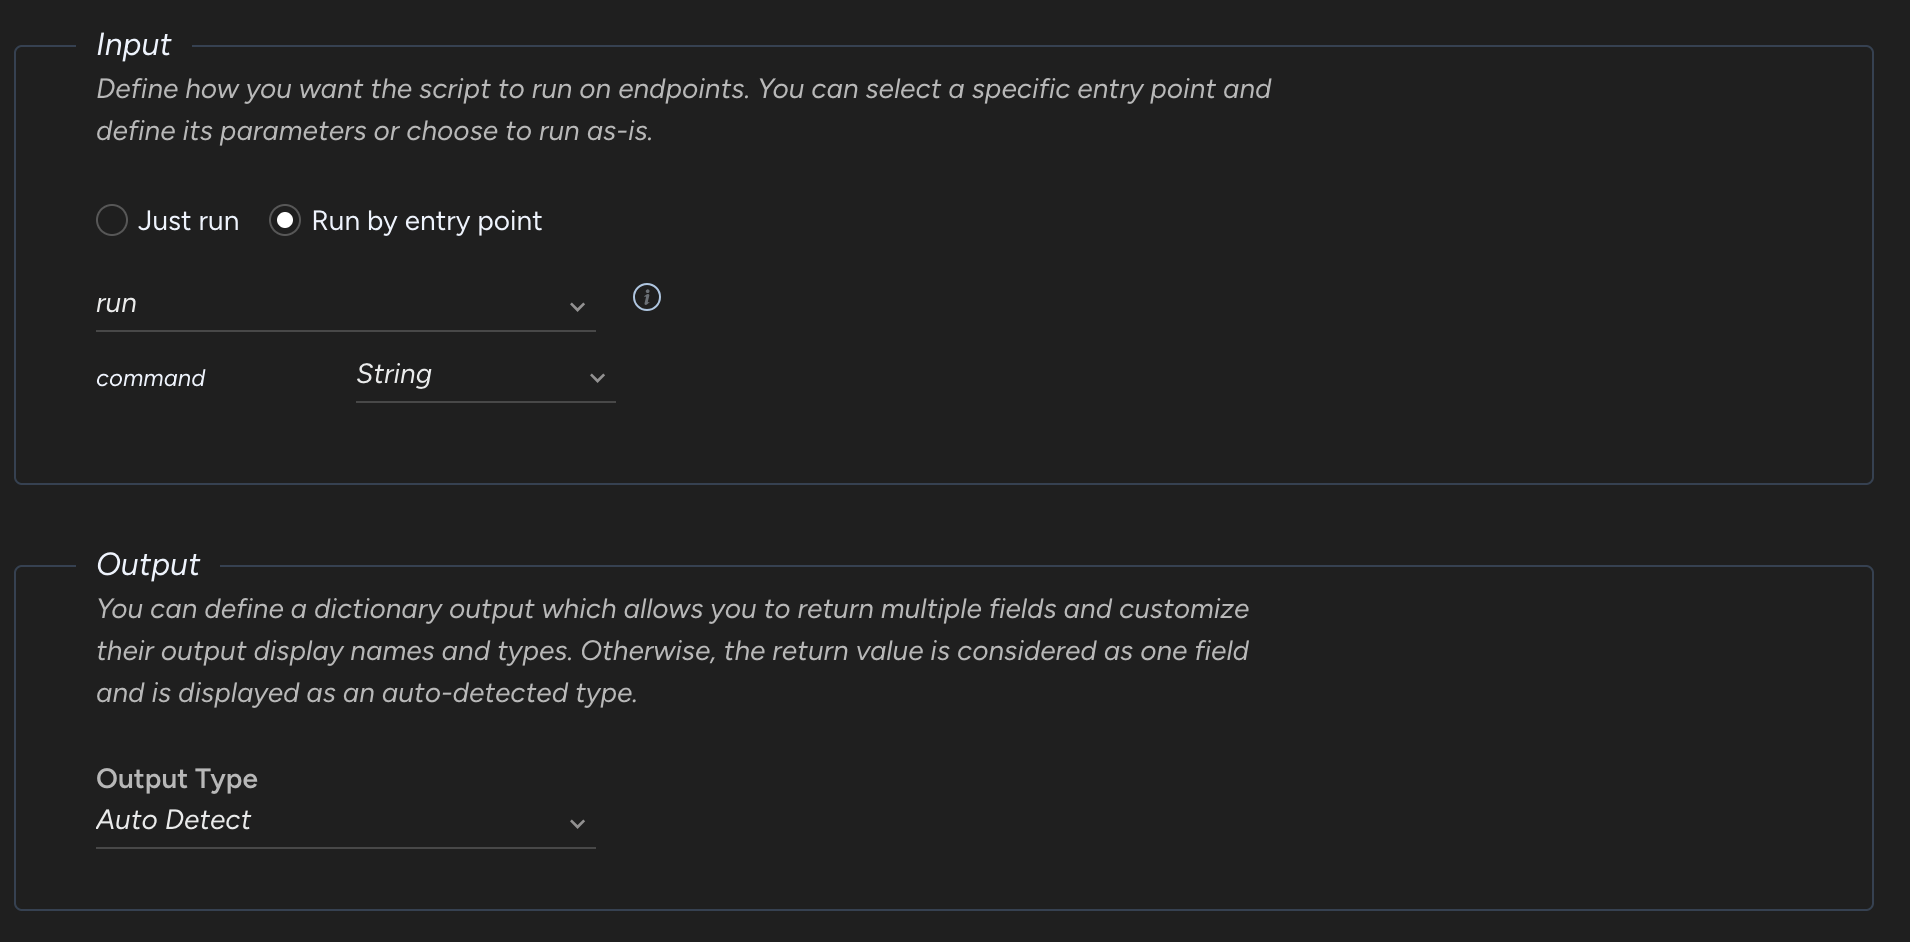
Put the following script:
Put the following Input schema:
{
  "$schema": "https://json-schema.org/draft/2020-12/schema",
  "properties": {
    "command": {
      "type": "string"
    }
  },
  "required": [
    "command"
  ],
  "type": "object",
  "description": "This generated schema may need tweaking. In particular format fields are attempts at matching workflow field types but may not be correct."
}
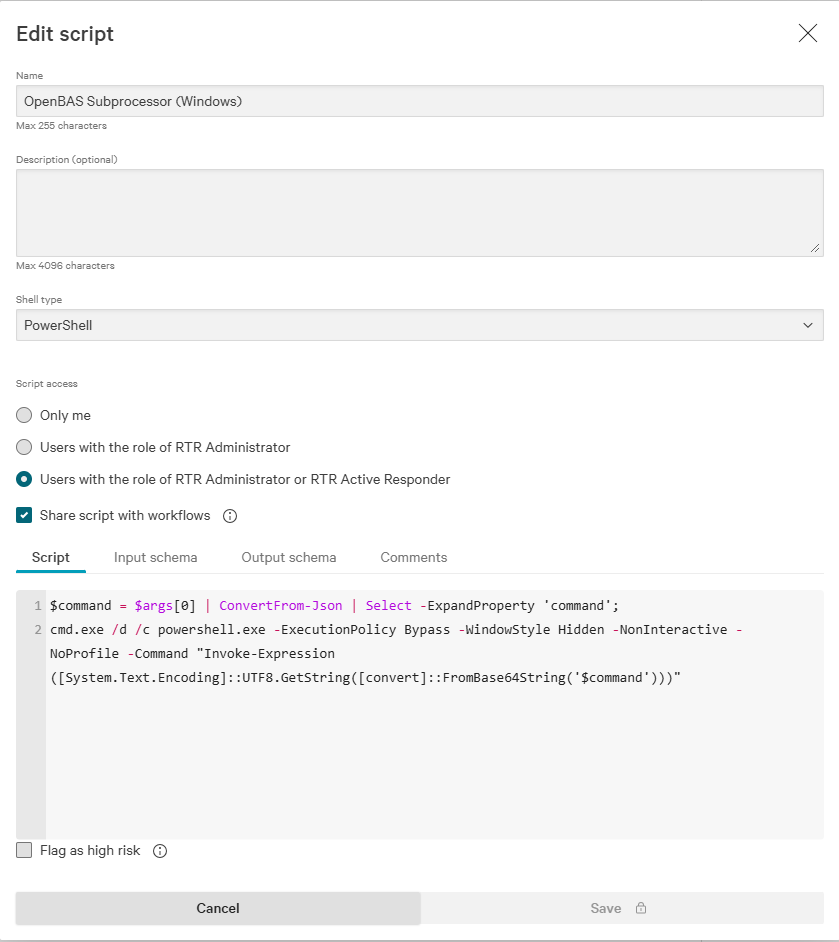
Windows script
| Attribute | Value |
|---|---|
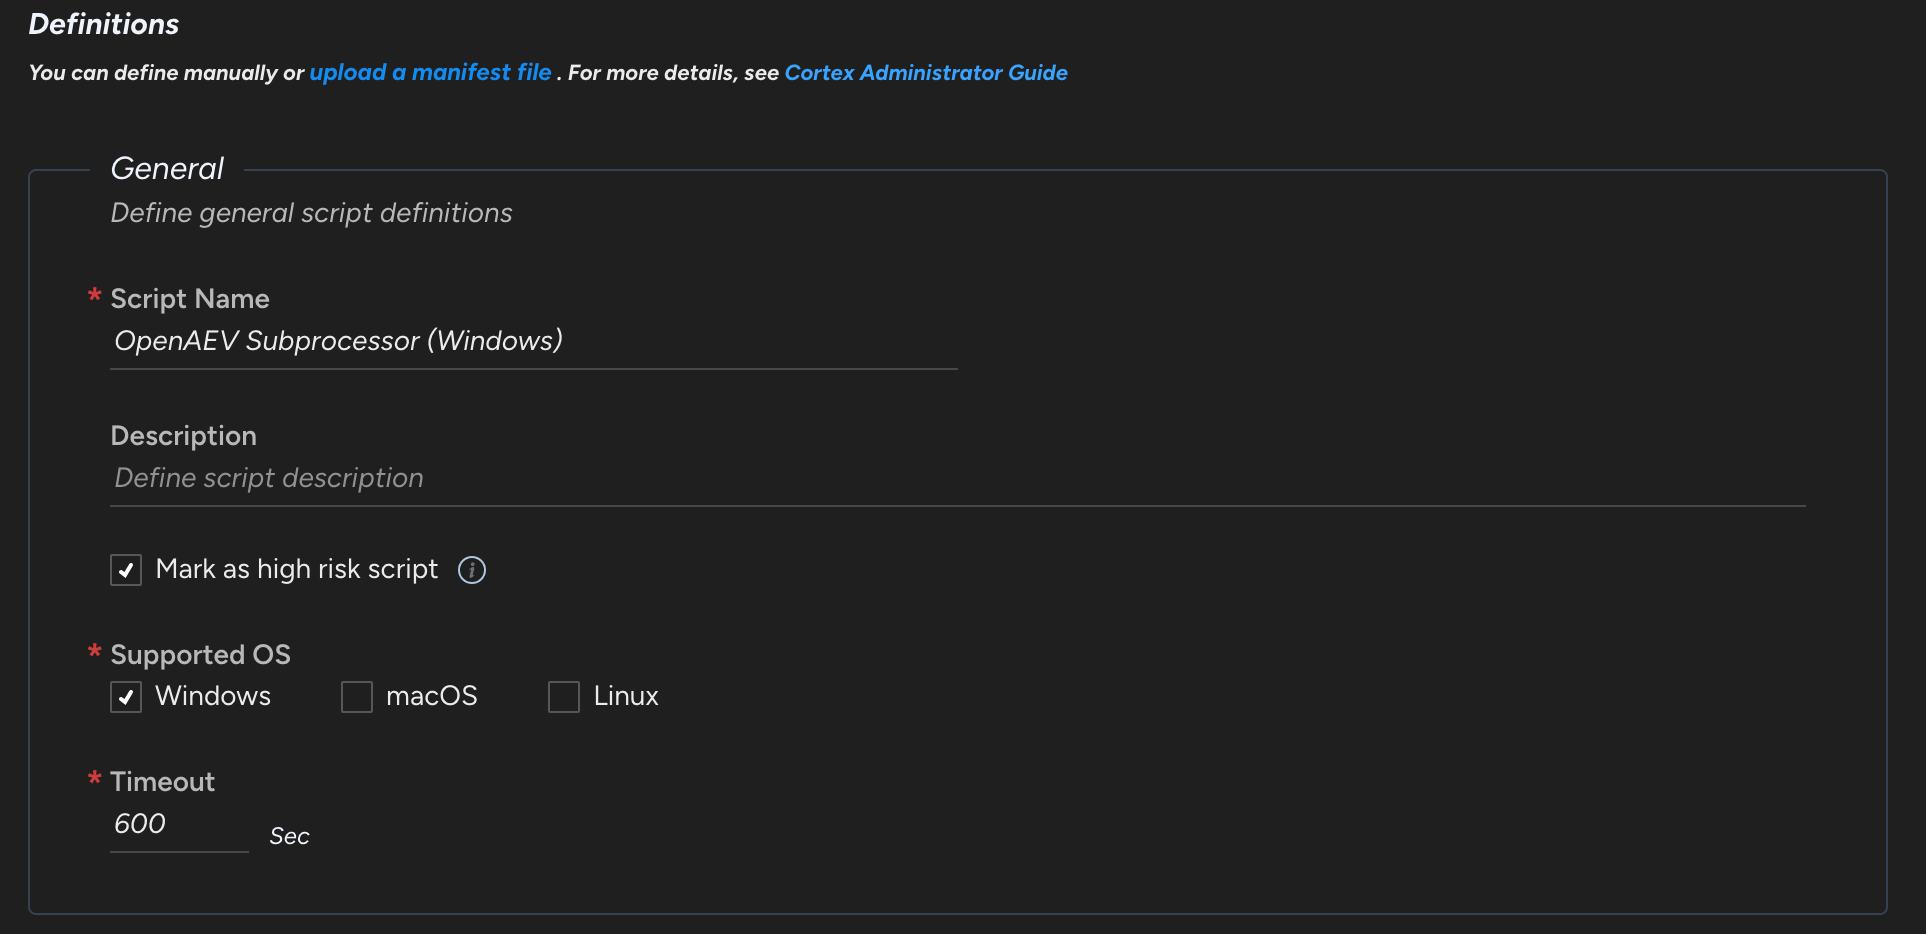
| name | OpenAEV Subprocessor (Windows) |
| shell type | PowerShell |
| script access | Users with the role of RTR Administrator or RTR Active Responder |
| shared with workflows | yes |
Put the following script:
$command = $args[0] | ConvertFrom-Json | Select -ExpandProperty 'command';
cmd.exe /d /c powershell.exe -ExecutionPolicy Bypass -WindowStyle Hidden -NonInteractive -NoProfile -encodedCommand $command
Put the following Input schema:
{
  "$schema": "https://json-schema.org/draft/2020-12/schema",
  "properties": {
    "command": {
      "type": "string"
    }
  },
  "required": [
    "command"
  ],
  "type": "object",
  "description": "This generated schema may need tweaking. In particular format fields are attempts at matching workflow field types but may not be correct."
}
Once created, your RTR scripts should have something like this:

Create a host group with your targeted assets
To create a host group, go to Host setup and management > Host groups.
Create/Update response policies for your targeted platforms
As OpenAEV will ask CrowdStrike to create implants in order to execute threat arsenal actions as scripts, you need to allow the execution of custom scripts on your assets. To do so, you need to create a new response policy or update an existing one for your assets' platforms.
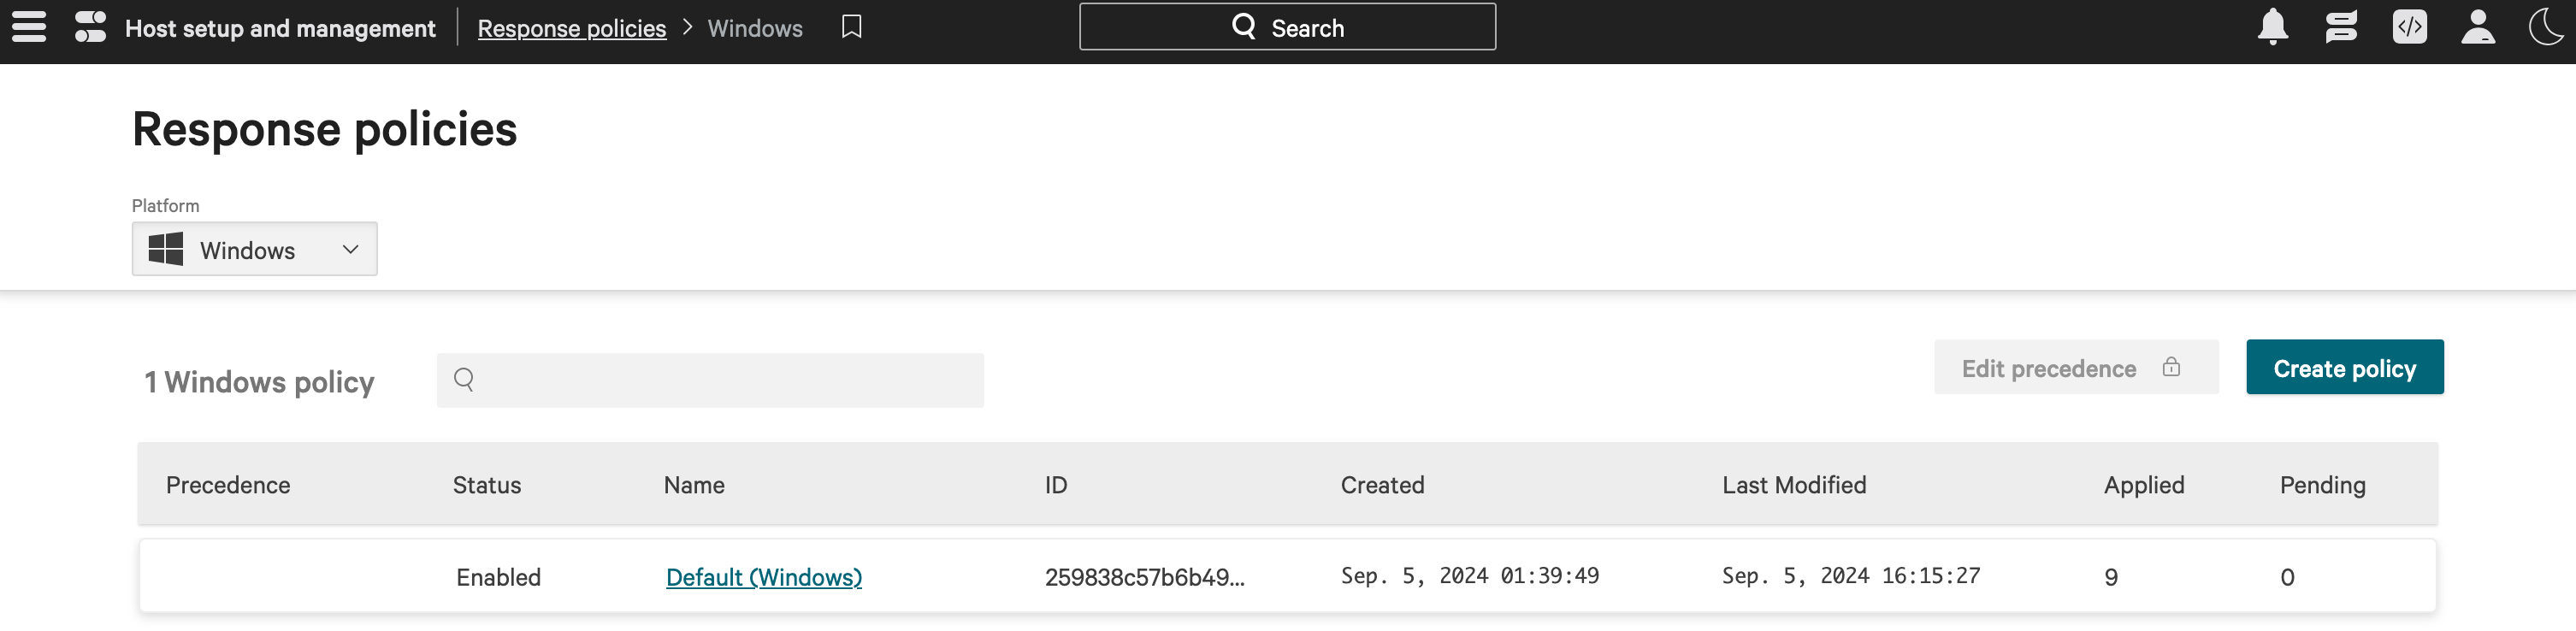
To create or update a response policy, go to Host setup and management > Response policies.
There, choose a platform in the top left selector, then click on Create policy or click on the name of an existing
one.
The CrowdStrike UI should present you with a screen like this:
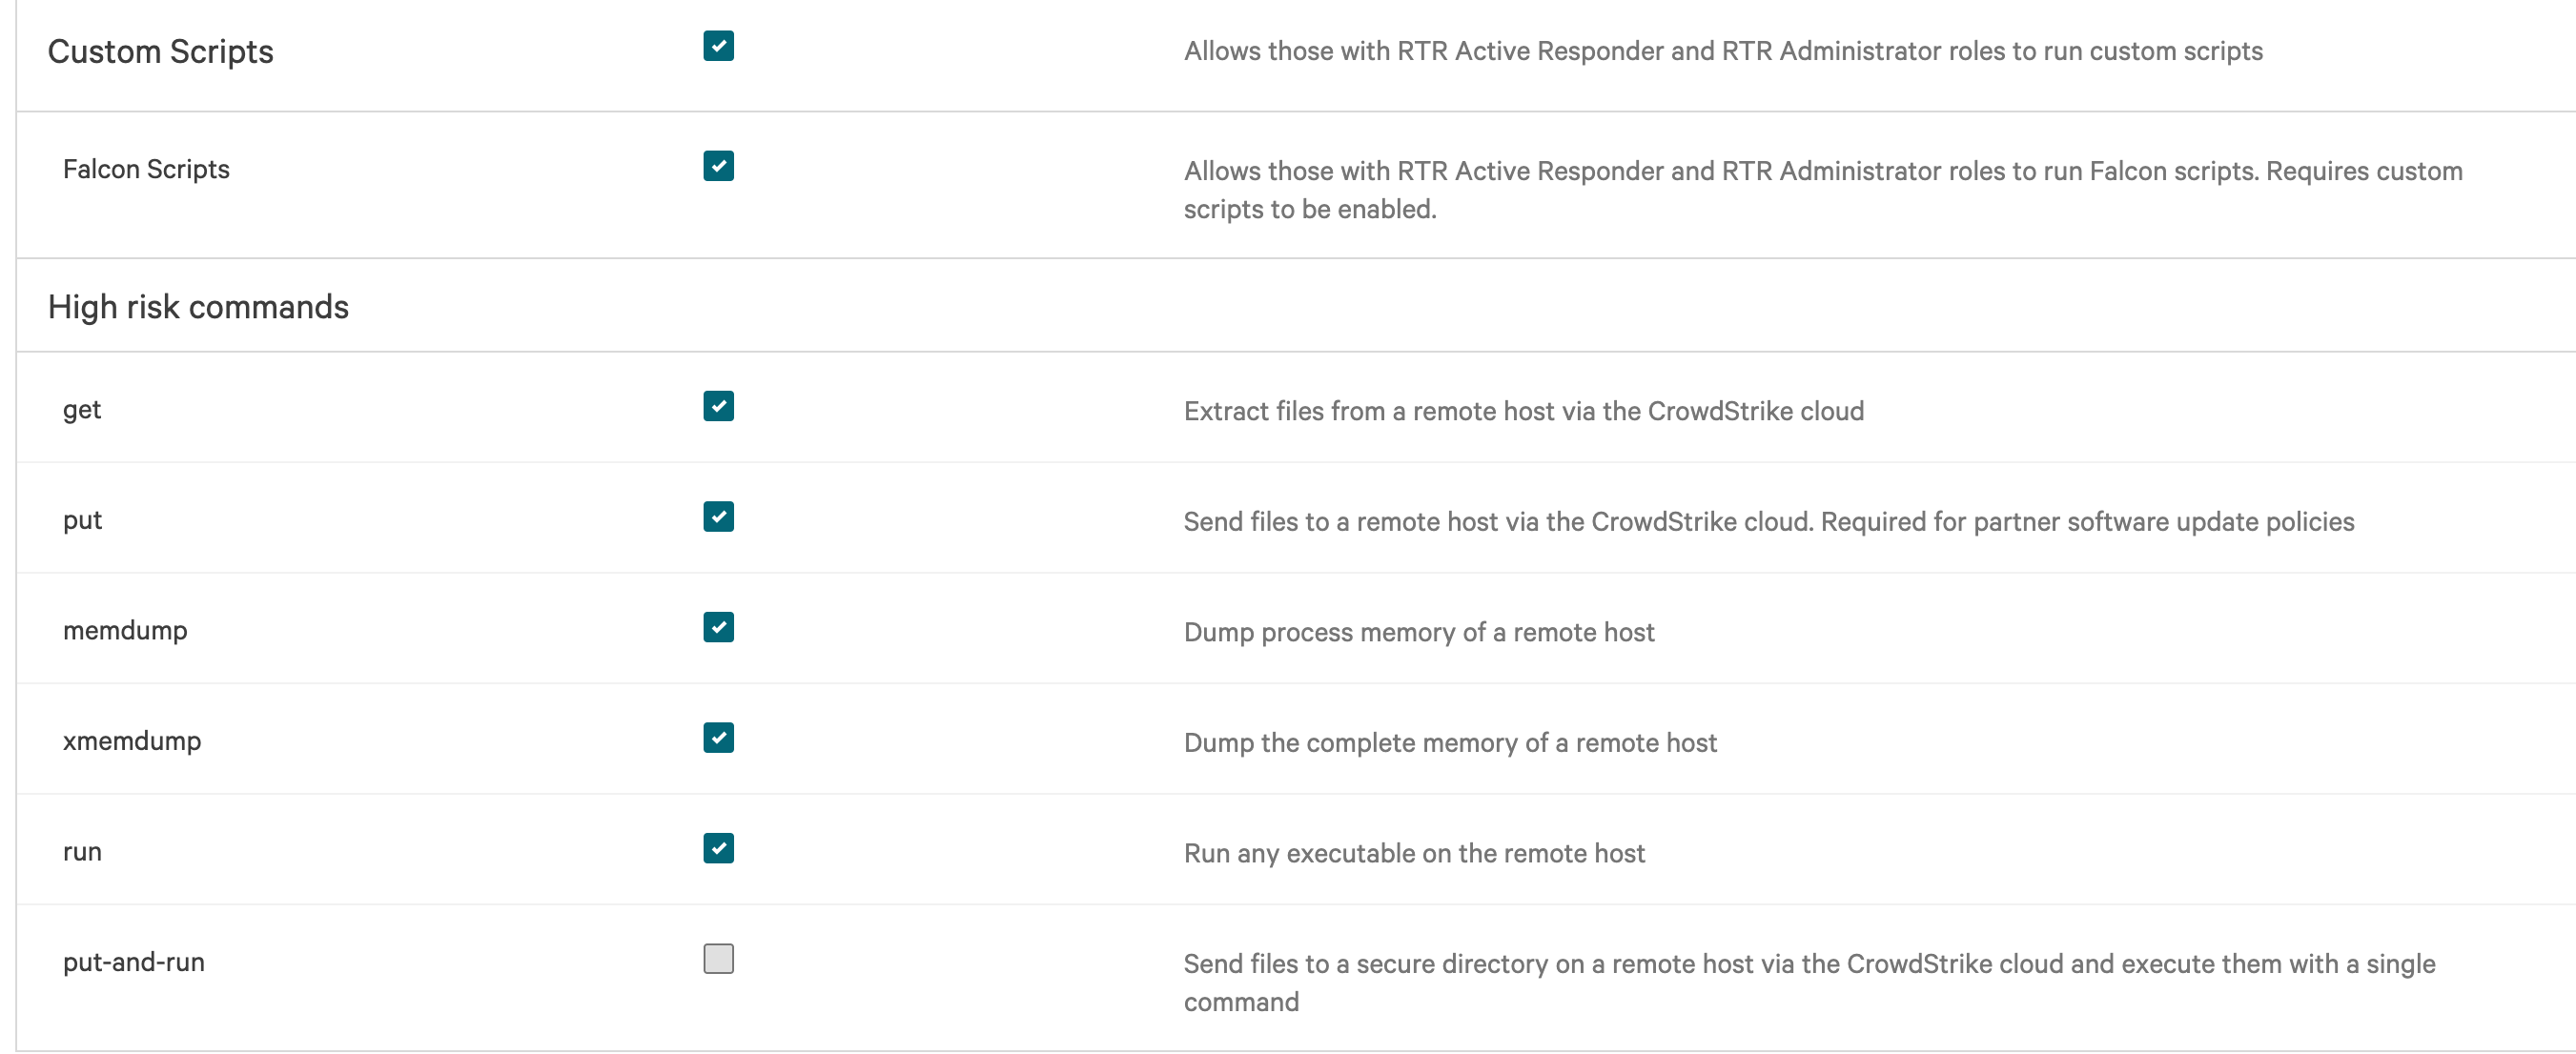
On this screen, click to allow Custom Scripts execution.
If an option named Falcon Scripts exists, allow it as well.
For the other options, you can choose to allow or deny them according to your security policy and what you want to test.
Click on Save to save your changes.
Finally, click on the Assigned host groups tab to add your previously created group to this policy.
Once done, the policy may take a few minutes to be applied to your assets.
You can go back to the policies list screen and check that there is a 0 in the Pending column to know that it has been
applied.
Configure the OpenAEV platform
CrowdStrike API Key
Please note that the CrowdStrike API key should have the following permissions: API integrations, Hosts, Host groups, Real time response.
To configure the CrowdStrike executor, navigate to the Integrations > Executors section in the OpenAEV menu and fill in the CrowdStrike integration settings directly from the UI.
Migrating from environment variables
If you previously configured this executor using environment variables or platform properties, these values have been automatically migrated to the database on first startup. After migration, changes to environment variables or properties are no longer taken into account — all configuration is now managed through the UI.
Checks
Once enabled, you should see CrowdStrike available in your Install agents section
Also, the assets and the asset groups in the selected computer groups should now be available in the endpoints and asset groups sections in OpenAEV:

NB : An Asset can only have one CrowdStrike agent installed due to the uniqueness of the MAC address parameters. If you try to install again a CrowdStrike agent on a platform, it will overwrite the actual one and you will always see one Endpoint on the OpenAEV endpoint page.
Installation done
You are now ready to leverage your CrowdStrike platform to run OpenAEV threat arsenal actions!
Palo Alto Cortex Agent
The Palo Alto Cortex agent can be leveraged to execute implants as detached processes that will then execute threat arsenal actions according to the OpenAEV architecture.
On Windows, because Palo Alto Cortex whitelists its own process tree, OpenAEV creates a scheduled task to detach the process that will execute the threat arsenal actions.
Configure the Palo Alto Cortex Platform
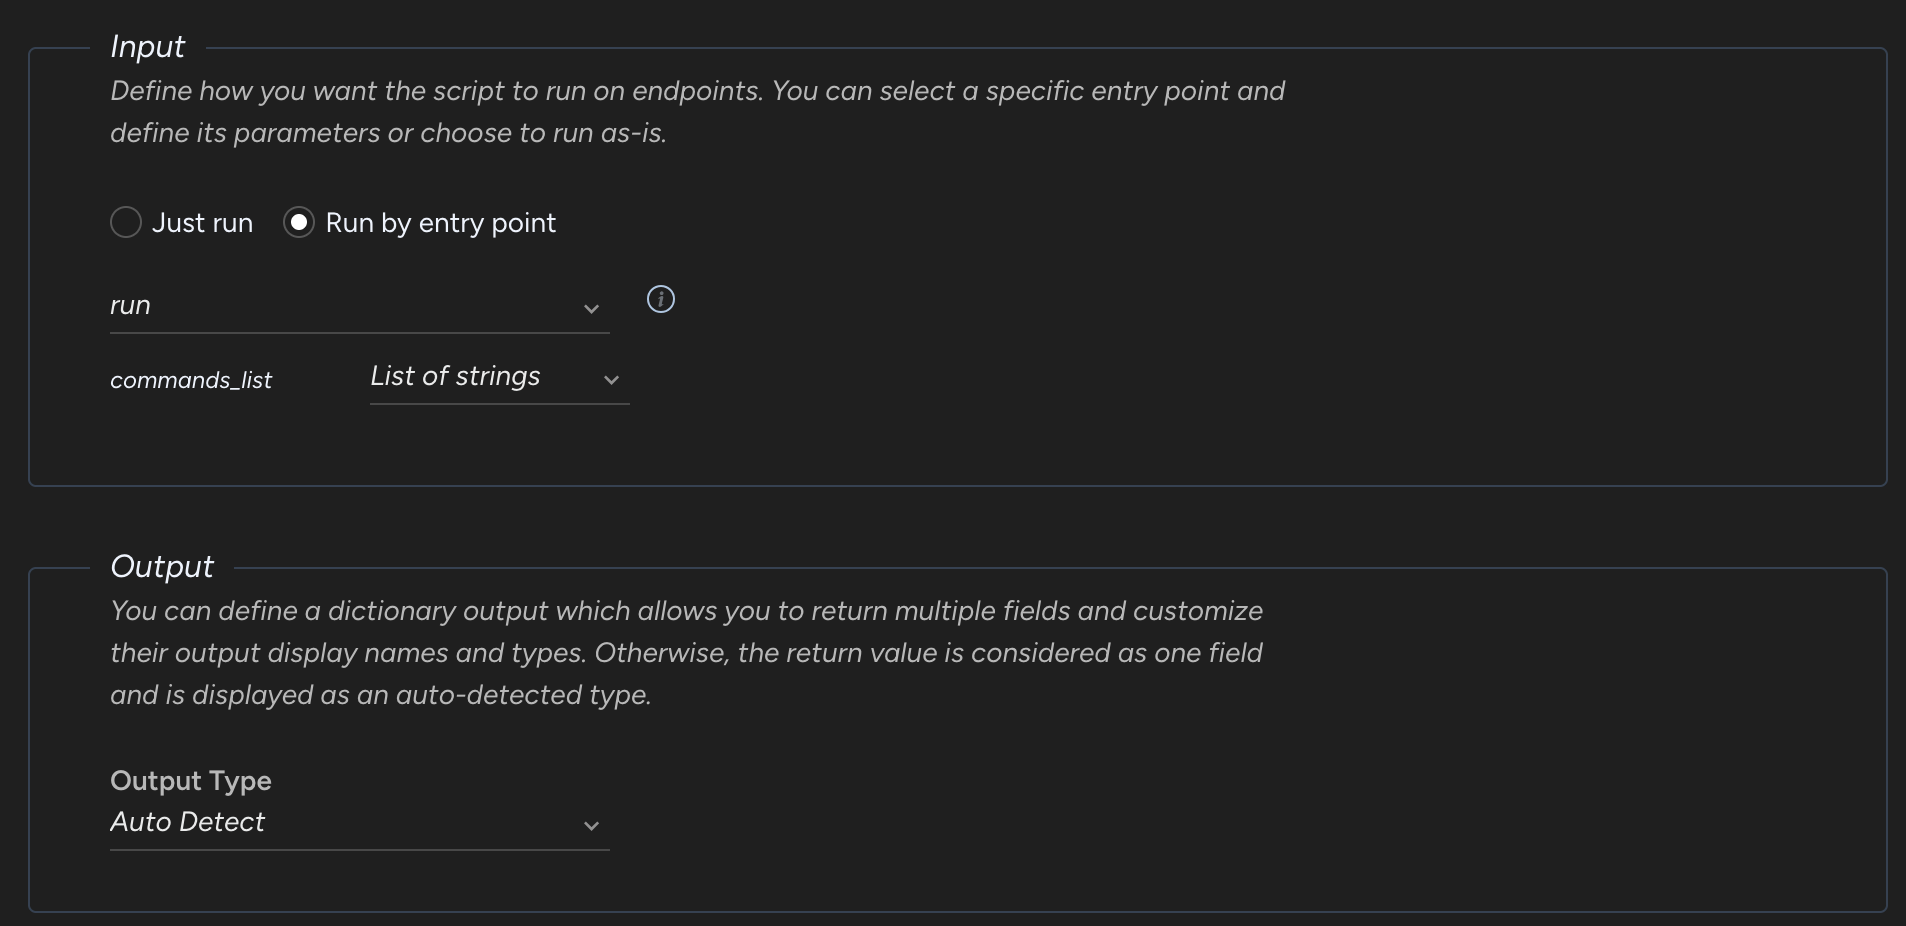
Upload OpenAEV scripts
First of all, you need to create one custom script for Unix, covering both Linux and MacOS systems and another one for Windows.
To create these scripts, go to Investigation & responses > Action Center > Agent Script Library > + New Script.
The names
of the scripts can be changed if necessary, the ids will be put in the OpenAEV configuration.
To get the scripts IDs, it may be necessary to add the Script UID column to the scripts list view.
Unix Script
Upload the following Python script:
Put the following Input schema:
Windows script
Upload the following Python script:
Put the following Input schema:
Create a group with your targeted assets
To create a group, go to Inventory > Endpoints > Groups.
Configure the OpenAEV platform
Palo Alto Cortex API Key
Please note that the Palo Alto Cortex API key created in "Settings/Configurations/API Keys" should have the following minimum role: "Instance Administrator" and security level: "Standard".
To configure the Palo Alto Cortex executor, navigate to the Integrations > Executors section in the OpenAEV menu and fill in the Palo Alto Cortex integration settings directly from the UI.
Checks
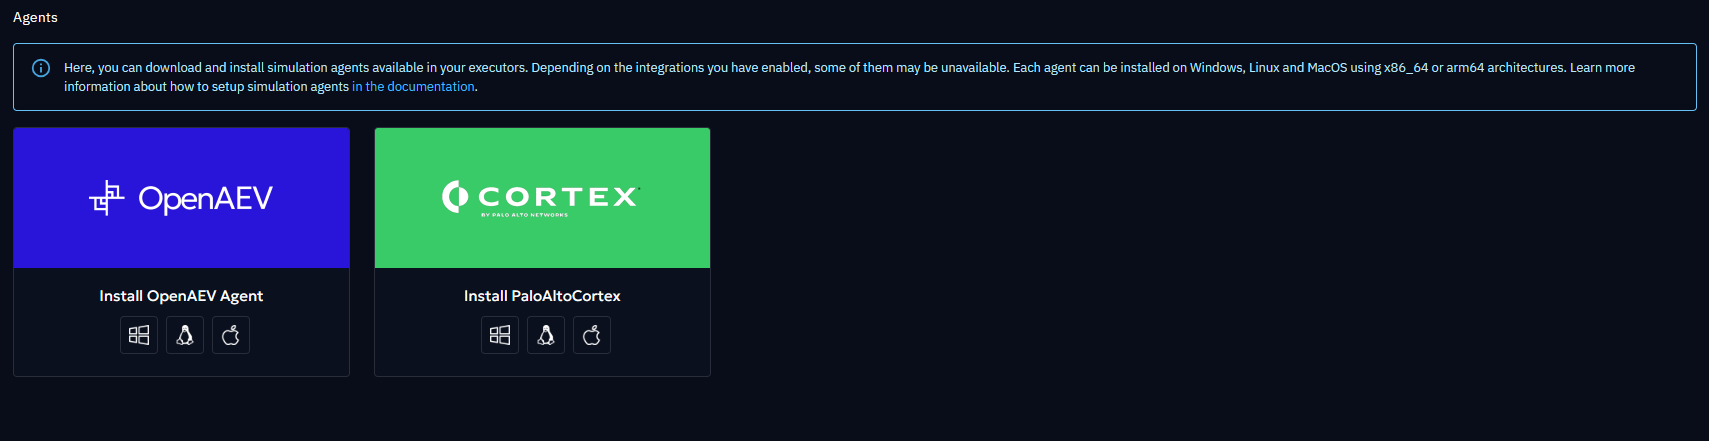
Once enabled, you should see Palo Alto Cortex available in your Install agents section
Also, the assets and the asset groups in the selected groups should now be available in the endpoints and asset groups sections in OpenAEV:

NB : An Asset can only have one Palo Alto Cortex agent installed due to the uniqueness of the MAC address parameters. If you try to install again a Palo Alto Cortex agent on a platform, it will overwrite the actual one and you will always see one Endpoint on the OpenAEV endpoint page.
Installation done
You are now ready to leverage your Palo Alto Cortex platform to run OpenAEV threat arsenal actions!
SentinelOne Agent
The SentinelOne agent can be leveraged to execute implants as detached processes that will then execute threat arsenal actions according to the OpenAEV architecture.
SentinelOne
Please note that the SentinelOne license with add-on "remote script orchestration" is required to launch SentinelOne scripts with OpenAEV → see in SentinelOne/Settings/Configuration/Add-ons
Configure the SentinelOne Platform
Upload OpenAEV scripts
First of all, you need to create two custom scripts, one for Windows and one for Unix, covering both Linux and MacOS systems.
To create it, go to Automation > Remote Ops > Create new. The names
of the scripts can be changed if necessary, the ids will be put in the OpenAEV configuration.
Unix Script
Upload the following script (encoded for Unix):
Put the following Input schema:
Windows script
Upload the following script (encoded for Windows):
Put the following Input schema:

Once created, your Remote Ops scripts should have something like this:

Create a wrapper with your targeted assets
To create a wrapper (account/site/group), go to Settings > Accounts/Sites.
Configure the OpenAEV platform
SentinelOne API Key
Please note that the SentinelOne API key created in "Settings/Users/Service Users" should have the following minimum role: "IR Team". The API key and the scripts must be created for and with the same user and the required account/site.
To configure the SentinelOne executor, navigate to the Integrations > Executors section in the OpenAEV menu and fill in the SentinelOne integration settings directly from the UI.
Migrating from environment variables
If you previously configured this executor using environment variables or platform properties, these values have been automatically migrated to the database on first startup. After migration, changes to environment variables or properties are no longer taken into account — all configuration is now managed through the UI.
Checks
Once enabled, you should see SentinelOne available in your Install agents section
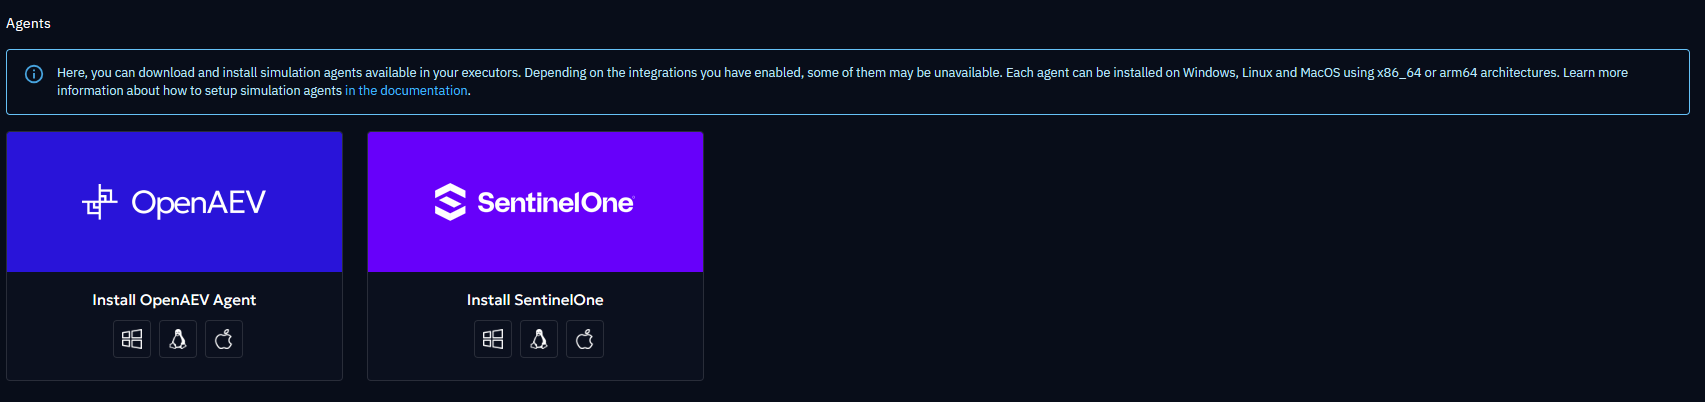
Also, the assets and the asset groups in the selected accounts/sites/groups should now be available in the endpoints and asset groups sections in OpenAEV:

NB : An Asset can only have one SentinelOne agent installed due to the uniqueness of the MAC address parameters. If you try to install again a SentinelOne agent on a platform, it will overwrite the actual one and you will always see one Endpoint on the OpenAEV endpoint page.
Installation done
You are now ready to leverage your SentinelOne platform to run OpenAEV threat arsenal actions!
Microsoft Defender for Endpoint (MDE) Agent
Microsoft Defender for Endpoint (MDE) can be leveraged to execute implants as detached processes that will then execute threat arsenal actions according to the OpenAEV architecture.
OpenAEV does not install a new agent: it reuses the MDE sensor already deployed on your endpoints and drives it through the Live Response API. For each inject, OpenAEV runs a small subprocessor script from the MDE Live Response Library, which downloads and starts the OpenAEV implant.
Enterprise Edition
The Microsoft Defender for Endpoint executor is an Enterprise Edition feature. A valid EE license is required to enable it.
Windows: detached scheduled task
On Windows, the MDE Live Response session terminates the whole process tree when the session ends. To let the implant
survive and report its execution traces, OpenAEV launches it from a detached SYSTEM scheduled task
(OpenAEV-Inject-<inject>-Agent-<agent>). This task self-deletes right after the implant finishes — you should
not see leftover tasks in Task Scheduler.
Configure the Microsoft Defender Platform
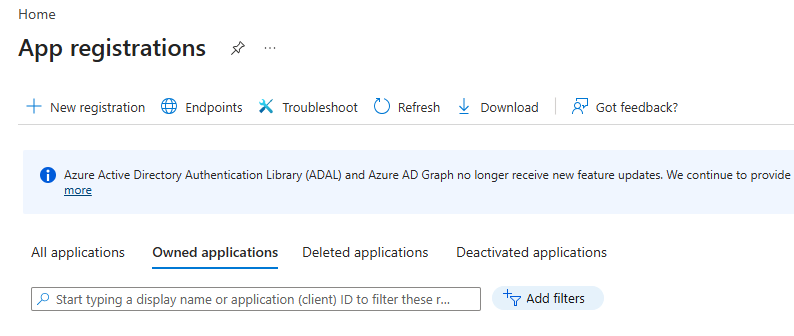
1. Register an Azure (Entra ID) application
OpenAEV authenticates to the MDE API with the OAuth2 client credentials flow. Create an app registration in Microsoft Entra ID > App registrations > New registration, then collect:
- Directory (tenant) ID →
Azure tenant IDin OpenAEV - Application (client) ID →
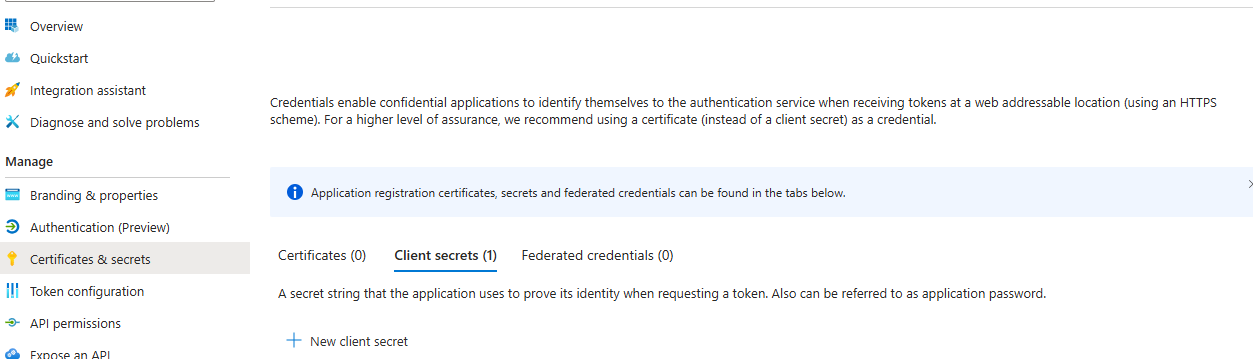
Client IDin OpenAEV - A client secret (
Certificates & secrets > New client secret) →Client secretin OpenAEV
Required API permissions
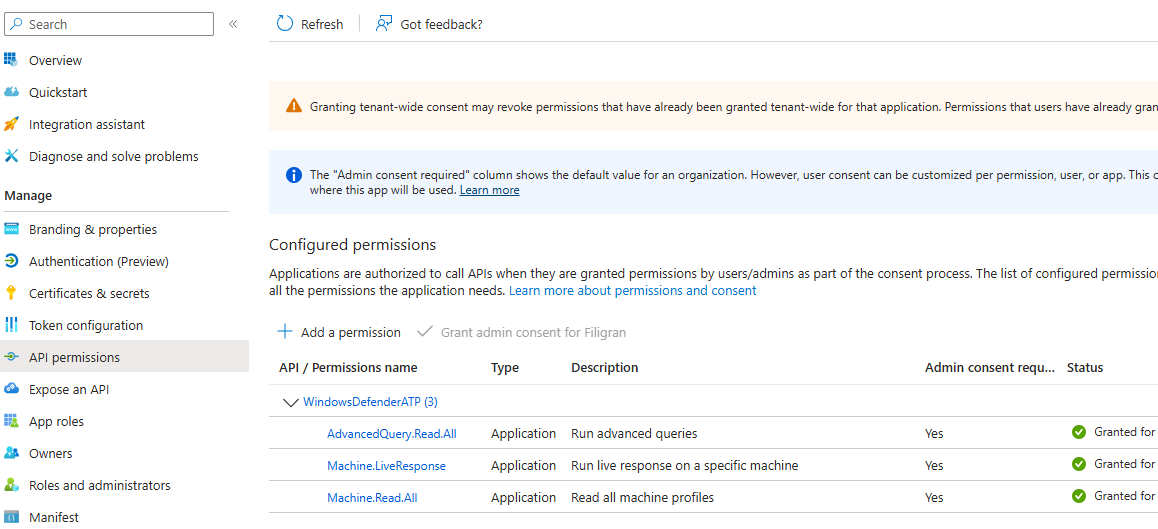
Under API permissions, add the following Application permissions for WindowsDefenderATP, then click Grant admin consent:
| Permission | Why |
|---|---|
Machine.Read.All |
List devices (and read their device-group name/id) and sync them into OpenAEV |
Machine.LiveResponse.All |
Run the Live Response script that launches the implant |
AdvancedQuery.Read.All |
Read near real-time device activity (Advanced Hunting) so only genuinely-reachable machines are marked active — the device inventory lastSeen lags by up to a day |
Application permissions (not delegated) are mandatory because OpenAEV runs without a signed-in user.
2. Enable Live Response in Microsoft Defender
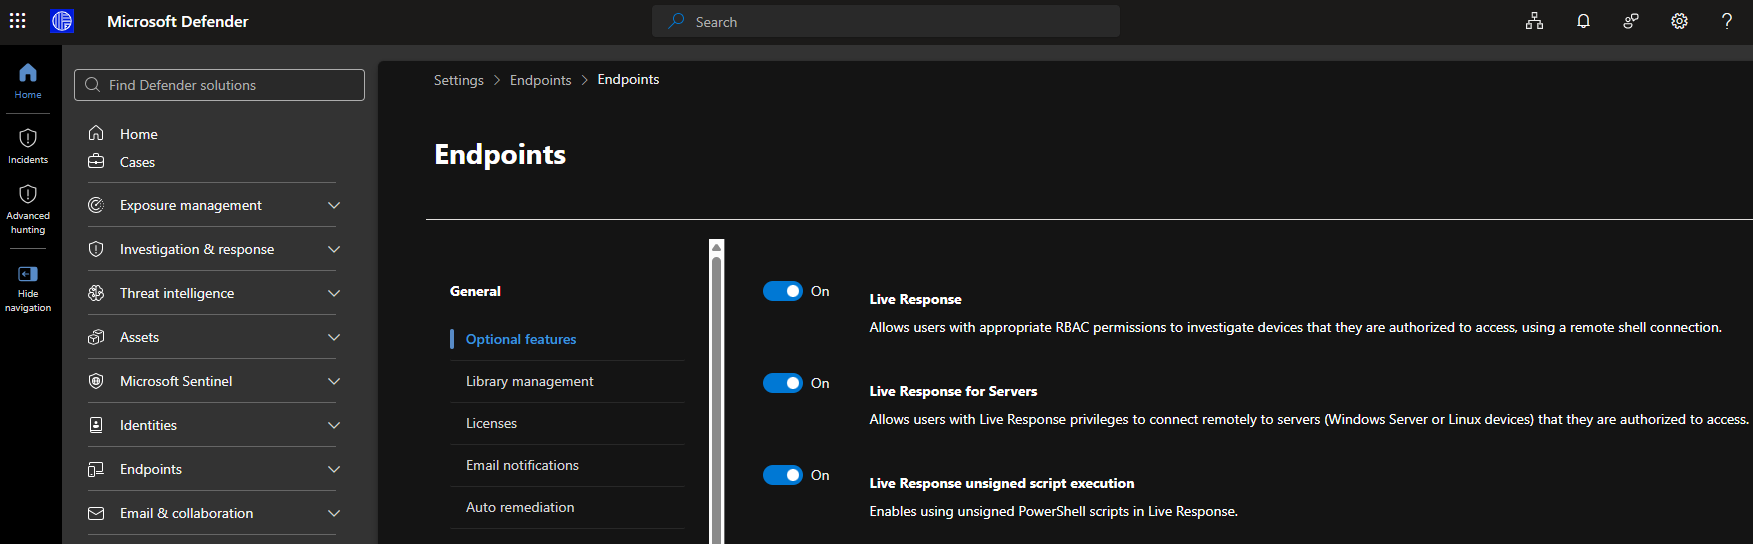
In the Microsoft Defender portal → Settings > Endpoints > Advanced features, enable:
- Live Response (required)
- Live Response for servers (only if you target Windows Server / Linux server endpoints)
- Live Response unsigned script execution (required — the OpenAEV subprocessor scripts are not code-signed)
Unsigned script execution
If Live Response unsigned script execution is disabled, every inject fails at the Live Response step because MDE refuses to run the OpenAEV subprocessor script. This is the single most common misconfiguration.
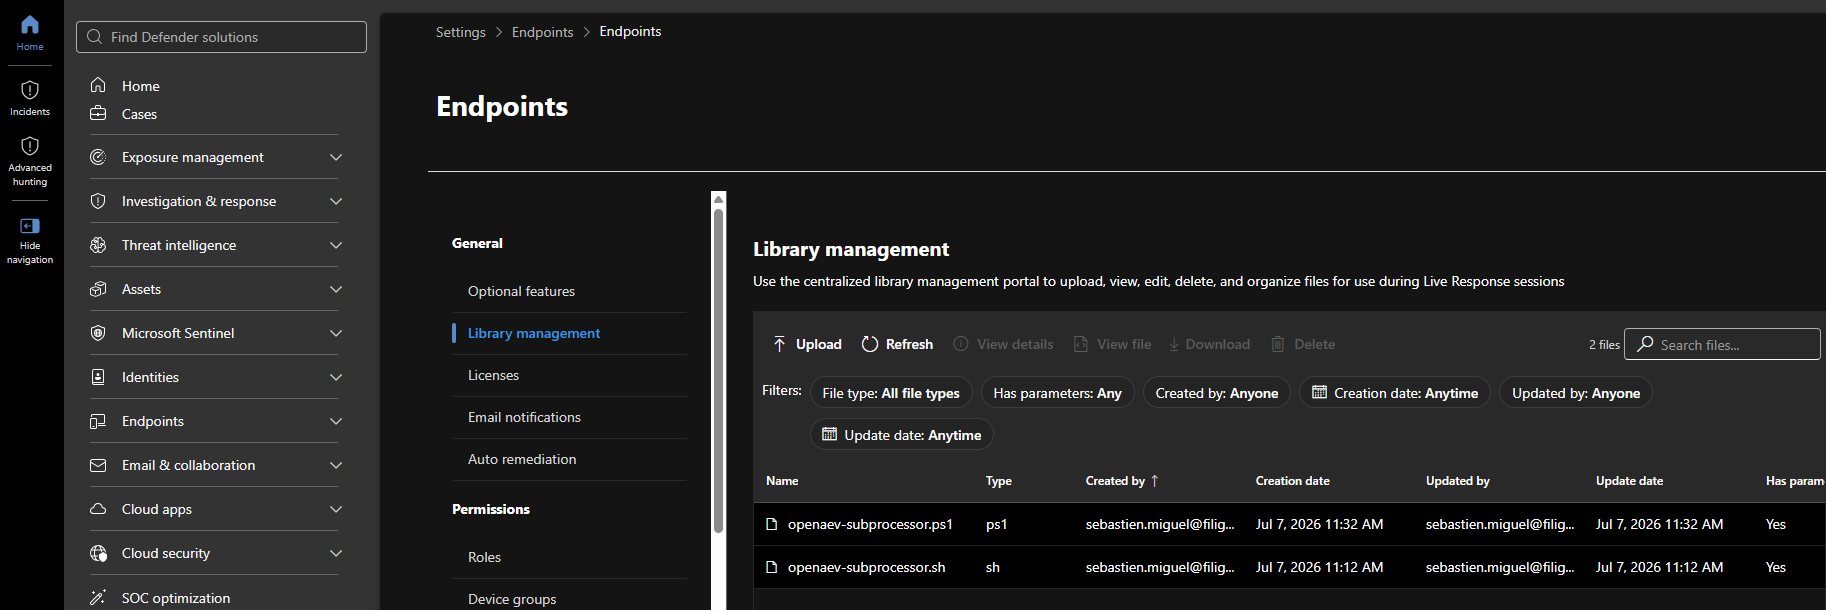
3. Upload the OpenAEV subprocessor scripts
Upload the two subprocessor scripts to the MDE Live Response Library (they decode the Base64 command sent by OpenAEV and execute it). The file names must match what you configure in OpenAEV (defaults below).
Windows script (openaev-subprocessor.ps1):
Unix script (openaev-subprocessor.sh, covers Linux and macOS):
How the scripts work
OpenAEV passes the full command as a single Base64 argument. The Windows script decodes it and runs it with
Invoke-Expression; the Unix script decodes it and pipes it to sh. Keep them as-is — reserved parameter names such
as param([string]$Args) will break argument passing on PowerShell ($args[0] must be used).
Tick Has parameters when uploading each script
In the upload dialog, enable the "parameters" option for both scripts. OpenAEV always invokes the subprocessor with the Base64 command as an argument; if parameters are not enabled, MDE runs the script without it and every inject fails. Both scripts must show Has parameters: Yes in the library.
4. (Optional) Scope to a device group
To sync only a subset of devices, set the device group ID (rbacGroupId) in OpenAEV. Leave the field empty to
sync all devices.
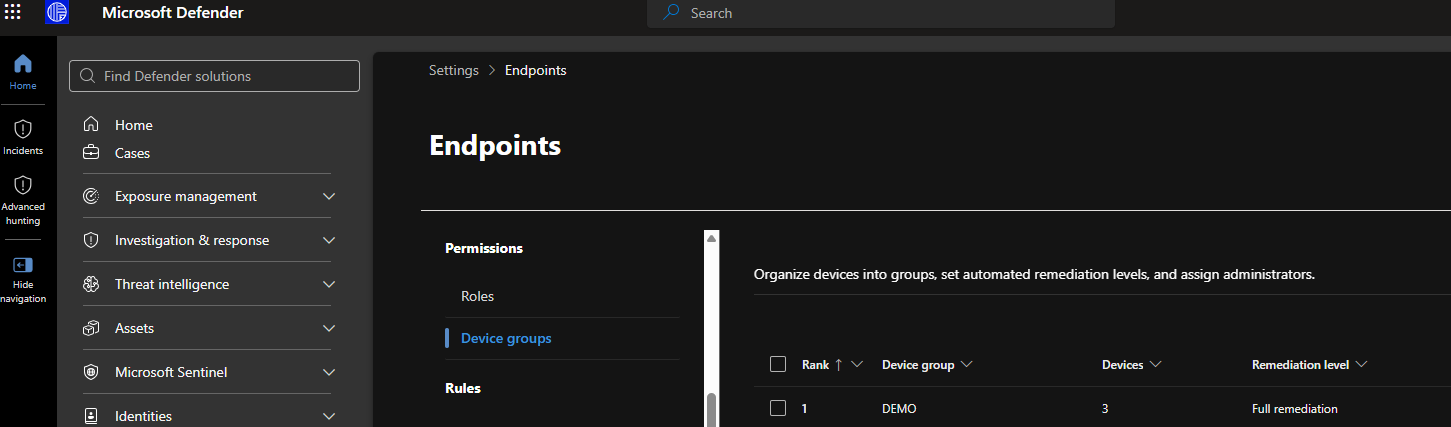
The numeric rbacGroupId is not shown in the Microsoft Defender UI
The Defender portal (Settings > Endpoints > Permissions > Device groups) shows device group names, not the
numeric rbacGroupId that OpenAEV needs. The MDE API also exposes no "list device groups" endpoint. The reliable way
to map a group name to its id is to read it from the machines inventory, which returns both rbacGroupName
and rbacGroupId for every device.
Run the following (PowerShell) against your tenant — it authenticates with the same Entra app registration and prints
the name → id mapping for every device group that has at least one machine:
$tenant = '<TENANT_ID>'
$client = '<CLIENT_ID>'
$secret = '<CLIENT_SECRET>'

$token = (Invoke-RestMethod -Method Post `
  -Uri "https://login.microsoftonline.com/$tenant/oauth2/v2.0/token" `
  -Body @{
    grant_type    = 'client_credentials'
    client_id     = $client
    client_secret = $secret
    scope         = 'https://api.securitycenter.microsoft.com/.default'
  }).access_token

$machines = Invoke-RestMethod `
  -Uri 'https://api.securitycenter.microsoft.com/api/machines?$select=rbacGroupId,rbacGroupName' `
  -Headers @{ Authorization = "Bearer $token" }

$machines.value |
  Select-Object rbacGroupName, rbacGroupId -Unique |
  Sort-Object rbacGroupName |
  Format-Table -AutoSize
Example output:
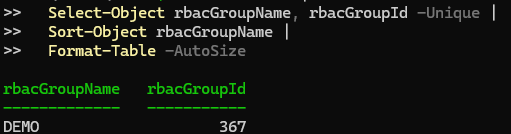
Here, syncing only the DEMO group means setting the OpenAEV Device group field to 367. Separate multiple IDs
with commas (for example 367,366). UnassignedGroup is the default group for machines not assigned to any custom
group.
The $select query above requires quoting
Keep the URI in single quotes so PowerShell does not interpret $select as a variable. The app registration
needs Machine.Read.All (already granted in step 1). A group appears only once it contains at least one machine that
MDE has seen.
Configure the OpenAEV platform
To configure the MDE executor, navigate to the Integrations > Executors section in the OpenAEV menu and fill in the Microsoft Defender for Endpoint integration settings directly from the UI.
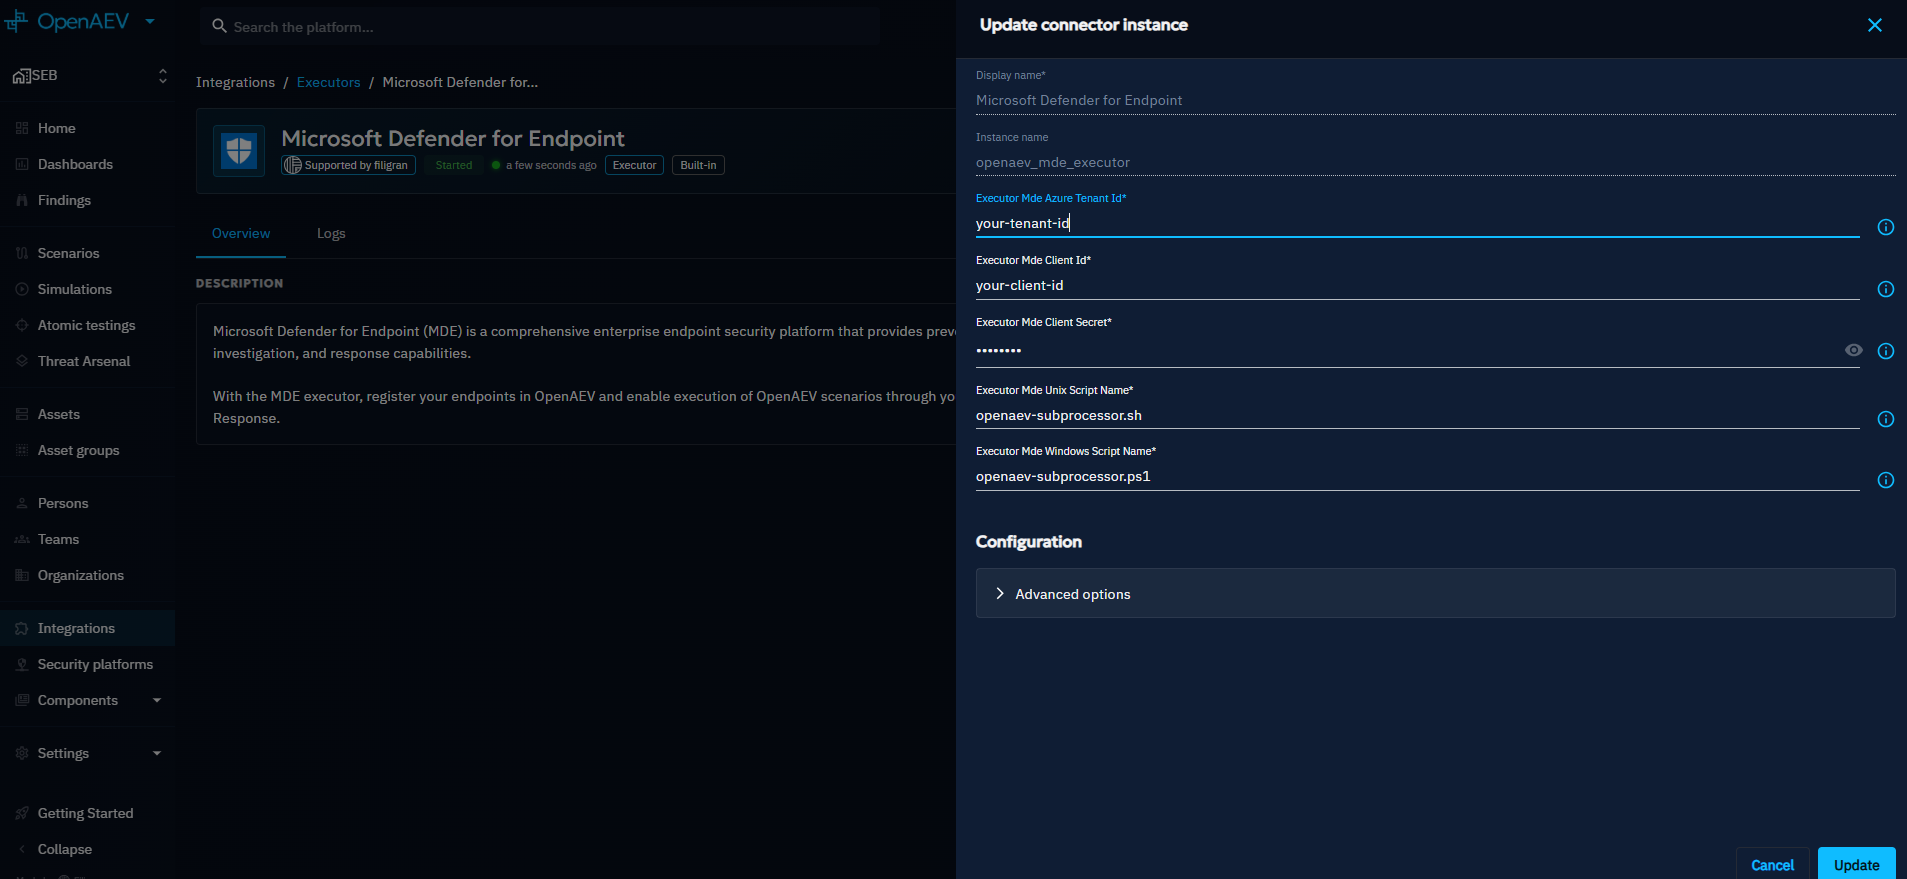
| Field | Required | Description |
|---|---|---|
| Azure tenant ID | ✅ | Directory (tenant) ID of the Entra app registration |
| Client ID | ✅ | Application (client) ID |
| Client secret | ✅ | Client secret value |
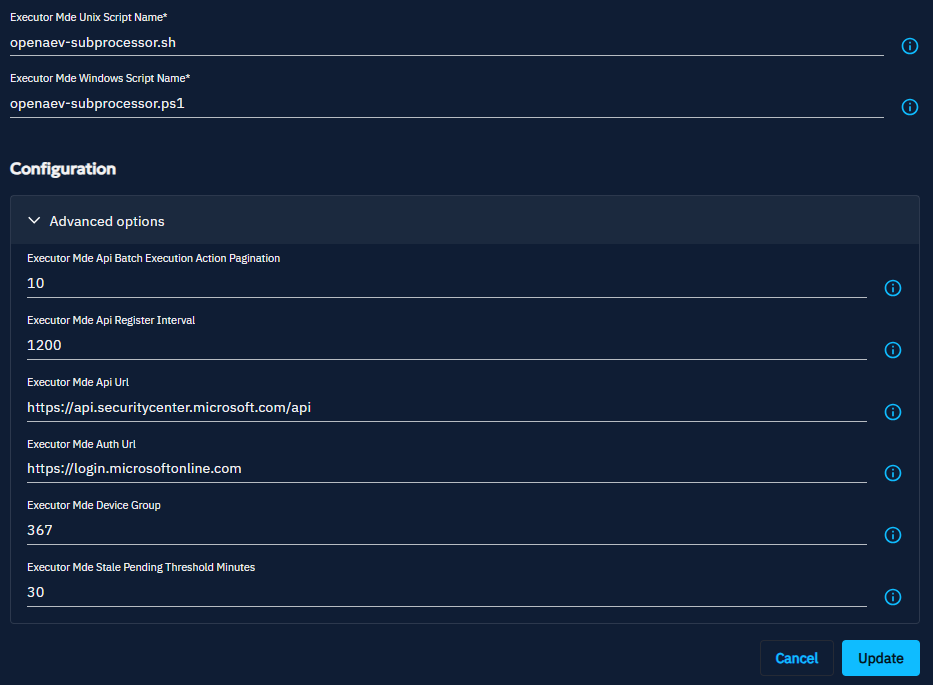
| Device group | ❌ | One or more rbacGroupId separated by commas. Empty = all devices |
| Windows script name | ✅ | Must match the uploaded Windows script (default openaev-subprocessor.ps1) |
| Unix script name | ✅ | Must match the uploaded Unix script (default openaev-subprocessor.sh) |
Advanced settings
Defaults rarely need changing: the API base URL (https://api.securitycenter.microsoft.com/api), the auth URL
(https://login.microsoftonline.com), the register interval (device/agent sync, default 1200s) and the Live
Response batch pagination (10 machines / 5s, the MDE rate limit is stricter than CrowdStrike).
Checks
Once enabled, you should see Microsoft Defender for Endpoint available in your Install agents section.
The devices in the selected device group(s) should now appear in the endpoints and asset groups sections in OpenAEV after the first sync (up to the register interval).
Where to see executions on the Microsoft side
Each inject is an MDE Live Response action. You can review them in the Microsoft Defender portal:
- Assets > Devices > device > Timeline and the device Live response session log
- Action center > History, filtered on Action type = Live response / Source = API
- Advanced hunting (KQL on
DeviceProcessEvents) to see the scheduled task, the implant and the payload commands
Installation done
You are now ready to leverage your Microsoft Defender for Endpoint platform to run OpenAEV threat arsenal actions!
Microsoft Defender for Endpoint — troubleshooting
Inject is ERROR but I have execution traces (stdout/stderr)
This is expected: the inject status reflects the payload's own exit code / stderr, not an executor failure. If the
payload command returns a non-zero exit code or writes to stderr (e.g. running net localgroup "Administrators" on a
non-English Windows, or a test designed to fail off-domain), the trace is marked ERROR even though the executor
delivered and ran it correctly. Check the stdout/stderr/exit_code in the execution trace to confirm.
Inject stays PENDING then TIMEOUT (no trace)
The implant was likely killed when the Live Response session ended. Ensure you are running a recent OpenAEV version
(the implant runs from a self-deleting SYSTEM scheduled task on Windows). Check Task Scheduler while an inject runs:
a task OpenAEV-Inject-... should appear briefly, then disappear.
\"Agent not found\" / \"Element not found\" on callback
OpenAEV resolves the calling agent by its MDE Device ID. A device that was re-provisioned or manually deleted can leave a stale agent whose primary key no longer matches the Device ID. Let a sync cycle run (or restart the platform) so the device is re-registered with the correct Device ID before relaunching.
Live Response fails immediately for every device
Verify Live Response unsigned script execution is enabled (see step 2), that both subprocessor scripts are in the
Live Response Library with the exact names configured in OpenAEV, and that the app registration has
Machine.LiveResponse.All with admin consent granted.
Devices are missing or show as inactive
OpenAEV filters devices by the configured device group and marks an agent active from near
real-time Advanced Hunting activity (the device inventory lastSeen lags by up to a day and is
not reliable). If the app registration lacks AdvancedQuery.Read.All, OpenAEV falls back to the
sensor healthStatus and logs a warning. Confirm the device group ID, that the machines are
onboarded and reporting to MDE, and that AdvancedQuery.Read.All is granted.
An inject times out on a device that looks active
Live Response only runs while the Defender sensor is actively connected. A device can be
onboarded and healthy yet asleep/offline right now: the runliveresponse action is then created
but stays Pending until the machine reconnects, so the inject times out. This is an inherent
MDE constraint (one Live Response session per machine, no execution while offline), not an OpenAEV
error. Stale Pending actions are cancelled automatically before the next dispatch so they never
block future injects.
Caldera Agent
The Caldera agent can be leveraged to execute implants as detached processes that will then execute threat arsenal actions according to the OpenAEV architecture.
Caldera already installed
If you already have a working Caldera installation, just go directly to OpenAEV configuration section.
Deploy Caldera
To deploy Caldera, you can just add Caldera to the OpenAEV stack, we advise you to modify your docker-compose.yml and
add a Caldera service:
services:
  caldera:
    image: openaev/caldera-server:5.1.0
    restart: always
    ports:
      - "8888:8888"
    environment:
      CALDERA_URL: http://localhost:8888
    volumes:
      - type: bind
        source: caldera.yml
        target: /usr/src/app/conf/local.yml
As you can see in the configuration, you will also need a configuration file caldera.yml because Caldera does not support well environment variables for configuration.
Download caldera.yml and put it
alongside your docker-compose.yml file. This file must be modified prior launching, only change what is marked as *
Change this*, listed below.
users:
  red:
    red: ChangeMe                                                                     # Change this
  blue:
    blue: ChangeMe                                                                    # Change this
api_key_red: ChangeMe                                                                 # Change this
api_key_blue: ChangeMe                                                                # Change this
api_key: ChangeMe                                                                     # Change this
crypt_salt: ChangeMe                                                                  # Change this
encryption_key: ChangeMe                                                              # Change this
app.contact.http: http://caldera.myopenaev.myorganization.com:8888                    # Change this
app.contact.tunnel.ssh.user_password: ChangeMe                                        # Change this
Just update your stack and check Caldera is running:
OpenAEV configuration
To configure the Caldera executor, navigate to the Integrations > Executors section in the OpenAEV menu and fill in the Caldera integration settings directly from the UI.
Migrating from environment variables
If you previously configured this executor using environment variables or platform properties, these values have been automatically migrated to the database on first startup. After migration, changes to environment variables or properties are no longer taken into account — all configuration is now managed through the UI.
Agents
Deploy agents
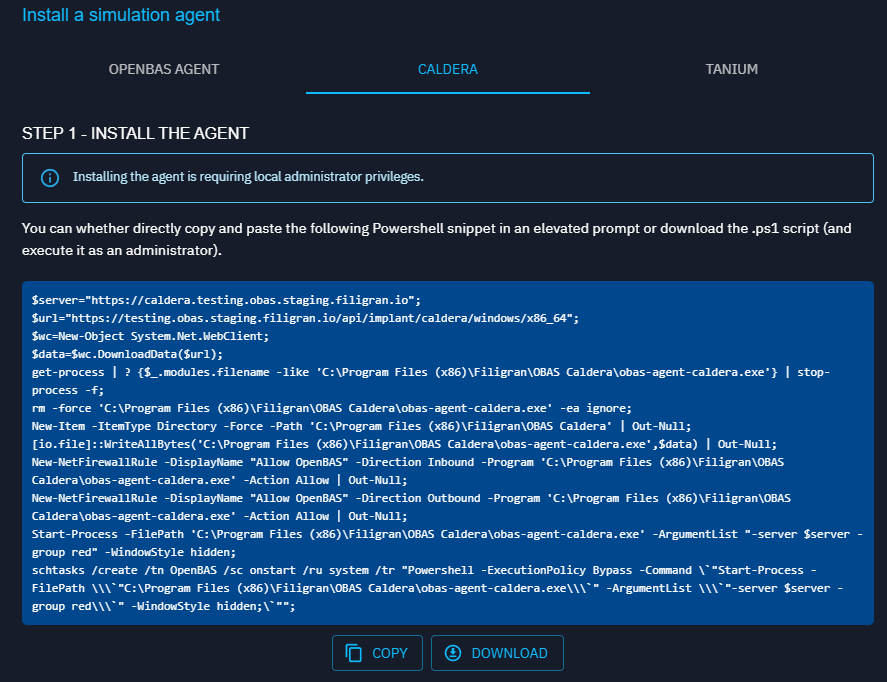
Once enabled, you should see Caldera available in your Install agents section:
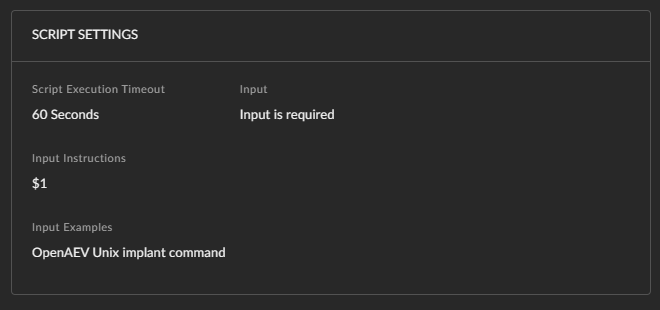
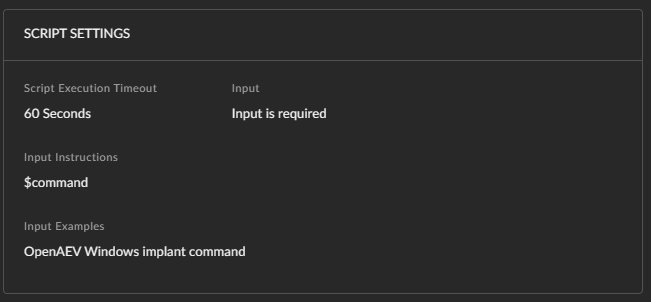
OpenAEV has built-in instruction if you want command line examples to deploy the agent on one endpoint.
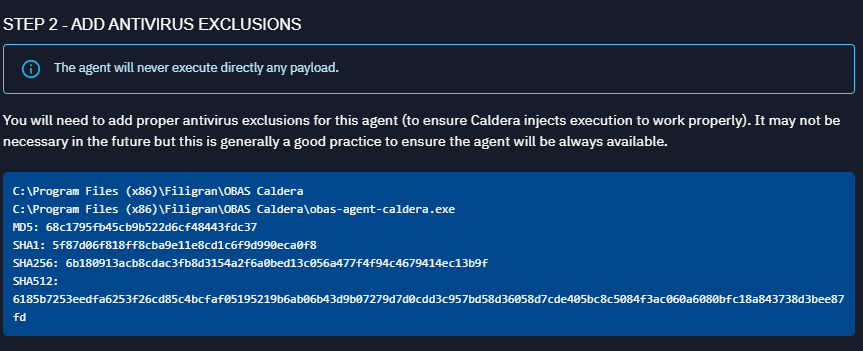
Caldera AV detection
By default, the Caldera agent "Sandcat" is detected and blocked by antivirus. Here, we are using Caldera as a neutral executor that will execute implants that will execute threat arsenal actions, so you need to add the proper AV exclusions as instructed in the OpenAEV screen.
Checks
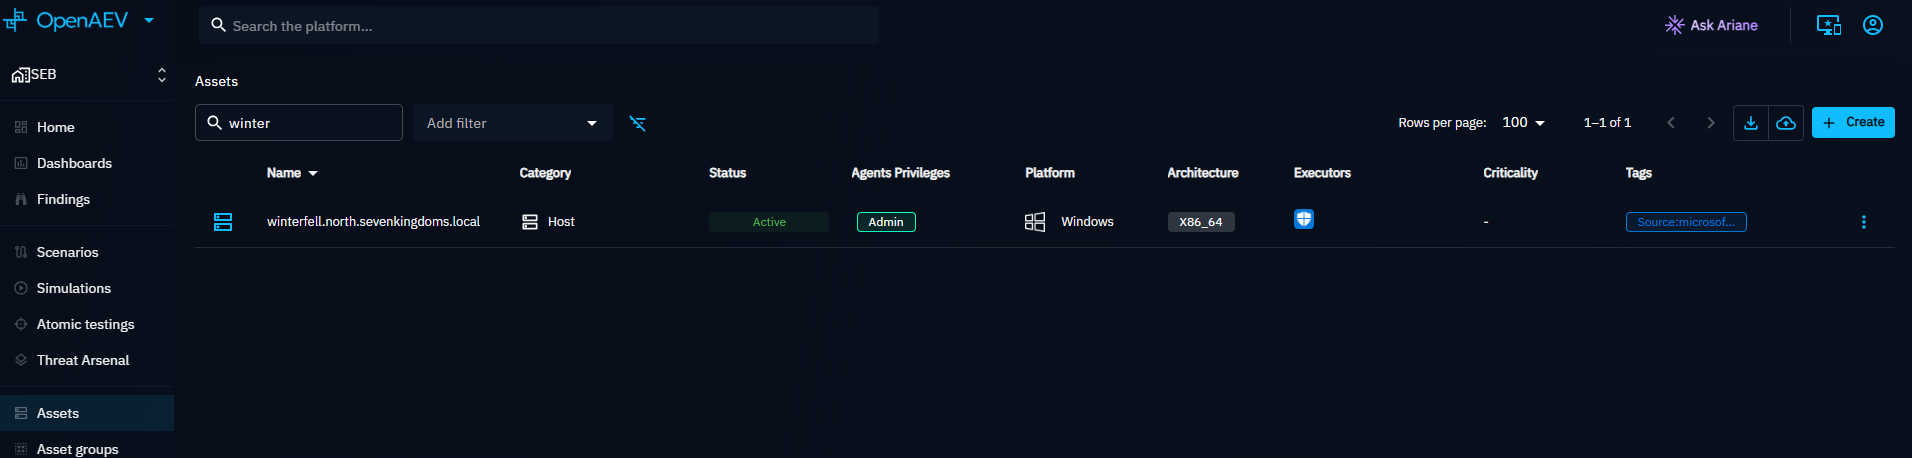
All assets with a proper Caldera agent installed using the OpenAEV provided command line (then persistent) should now be available in the OpenAEV endpoints list.

Uninstallation
Run the following commands with an administrator Powershell in order to uninstall your Caldera agent:
schtasks /delete /tn OpenAEVCaldera
Stop-Process -Name oaev-agent-caldera
rm -force -Recurse "C:\Program Files (x86)\Filigran\OAEV Caldera"
Implant Directories and Cleanup
For all executors (except Caldera and OpenAEV Agent) :
Implant Directories
Implants are downloaded into a runtimes/implant-XXXXX subdirectory relative to the agent's installation directory, where XXXXX is a unique UUID generated for each inject execution.
Each implant directory is unique per inject.
The installation directory path varies depending on the agent type and installation mode. Refer to installation mode for the exact paths.
Cleanup
Old implant directories are periodically cleaned up by the platform. At the interval defined by clean-implant-interval (default: 8 hours), the platform sends a cleanup command to each endpoint agent to remove directories in runtimes/ and payloads/ that are older than 24 hours.
OpenAEV Agent
The OpenAEV Agent has its own built-in garbage collector with different thresholds. See the OpenAEV Agent documentation for details.
Troubleshooting
When an inject fails to execute on an endpoint, follow this 5-step diagnostic process. This procedure applies to all EDR-based executors (CrowdStrike, Palo Alto Cortex, etc.).
Step 1 — Run the inject from OpenAEV
Trigger the inject normally from the OpenAEV platform and wait for it to reach a failed or timeout state.
Step 2 — Check the executor for an execution trace
Navigate to the executor console and look for a trace of the execution attempt.
Executor-dependent
The availability of an execution trace depends on the executor. See the per-executor sections below.
- ✅ Trace found → proceed to Step 3
- ❌ No trace → the issue is upstream: check connectivity, API credentials, whether the endpoint agent is properly registered in the executor platform, whether the script/payload pushed to the executor is correct, or whether the executor itself is misconfigured
Step 3 — Retrieve the command
In the executor console, locate and copy the exact command that was pushed by OpenAEV.
Step 4 — Decode and inspect the command
First potential failure point
The command may appear valid in the executor but fail silently due to encoding issues invisible at the platform level.
EDR-based executors use a Base64-encoded payload. Decode it before inspecting.
Once decoded, verify:
- Paths are correct for the target OS
- Parameters are well-formed
- No escaping or encoding issues are present
Step 5 — Execute the command directly on the endpoint
Second potential failure point
Running the command manually on the endpoint isolates whether the failure is in the delivery layer or the command itself.
Connect to the target endpoint via CLI and run the decoded command directly. Capture the full CLI output — this is the most actionable error information for diagnosis.