Attack Chaining
Attack Chaining lets you build a Scenario or Simulation that reacts to its own results while it runs, automatically triggering the next Actions as conditions are met. This page gives you the fastest path to build and run your own chained Scenario. Each step links to a dedicated page if you need more detail.
Note
Attack Chaining is an Enterprise Edition feature. See Enterprise edition to activate it on your platform.
What is Attack Chaining?
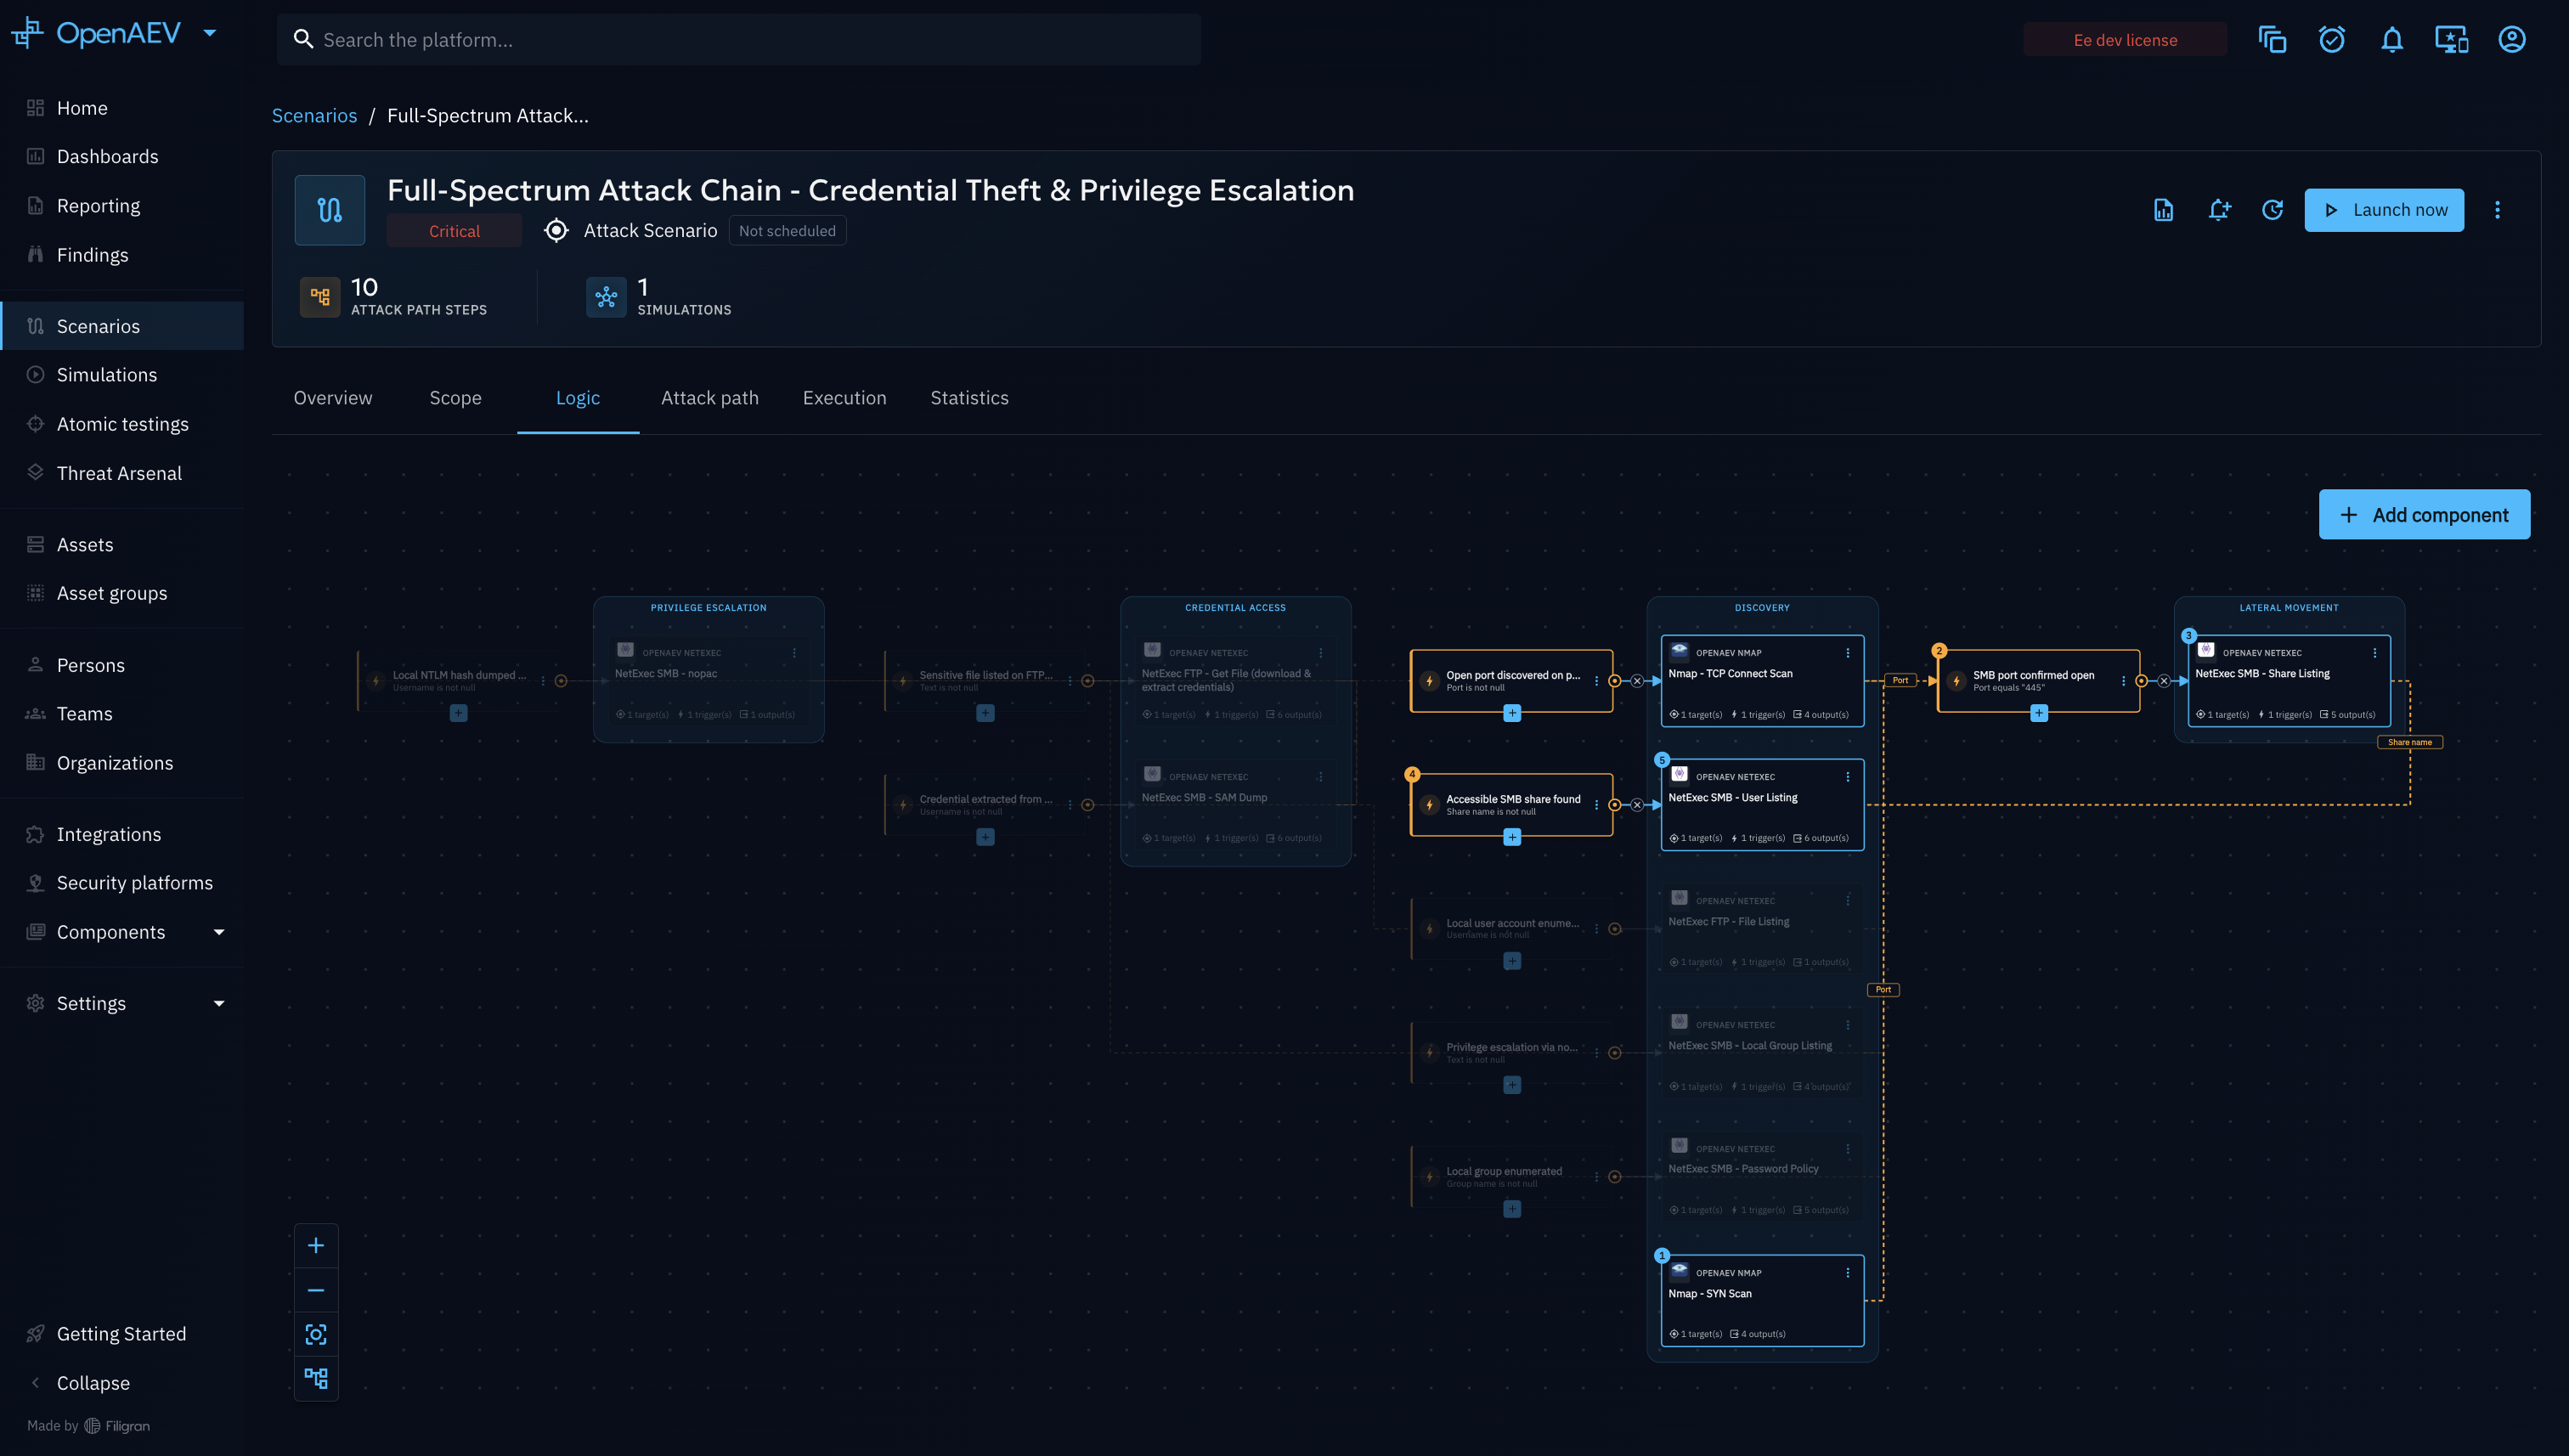
A classic OpenAEV Scenario or Simulation runs a fixed list of Injects at fixed times. Attack Chaining replaces that fixed plan with a logic flow: a graph of Actions (the Threat Arsenal actions you want to execute) and Events (the conditions that decide what happens next). When an Action finishes, its outputs are recorded, and each Event evaluates its conditions against those outputs — once satisfied, the Event triggers the Action(s) it is linked to.
This is powered by the Chaining Engine, which orchestrates the whole run: it evaluates conditions, tracks a shared pool of outputs (the global state), enqueues Actions when they become ready, and enforces the boundaries you define (allowed targets, timeout, rate limit).
Why use it?
- Model real multi-stage attacks: run lateral movement only if initial access succeeded, escalate only after a credential dump returned usable output, and so on.
- React to live data: branch on values produced during execution (an open port, a discovered credential, a scan result), not just on success/failure.
- Stay in control: restrict execution to an explicit allow/deny list of Assets, cap the total runtime, and throttle how often a step can retry.
- Watch it unfold: follow the graph live, then review the resulting Attack Path across your Assets once the run completes.
Note
Attack Chaining is a different mechanism from Inject chaining and transfer, which links individual Injects with a simple parent/child condition. Use Attack Chaining when you need a full graph of Actions and Events, shared outputs, and platform-enforced execution boundaries (scope, timeout, rate limit).
How do I do it?
1. Create a chained Scenario or Simulation
- Start creating a new Scenario (or a standalone Simulation) as usual.
- On the type selection step, pick Chained scenario (or Chained simulation) instead of the default Time-based option.
Once created, the Scenario/Simulation opens with dedicated tabs.
If you enable Lessons on the Scenario or Simulation details page, chained runs use the teams defined in the scope for the Lessons target picker.
2. Export or import a chained Scenario or Simulation
- Open the chained Scenario or Simulation.
- Use the export action to download the chained configuration.
- Keep Scope Definition enabled when you want to include workflow scope rules that define teams, domains, IP addresses, and other elements of chained execution.
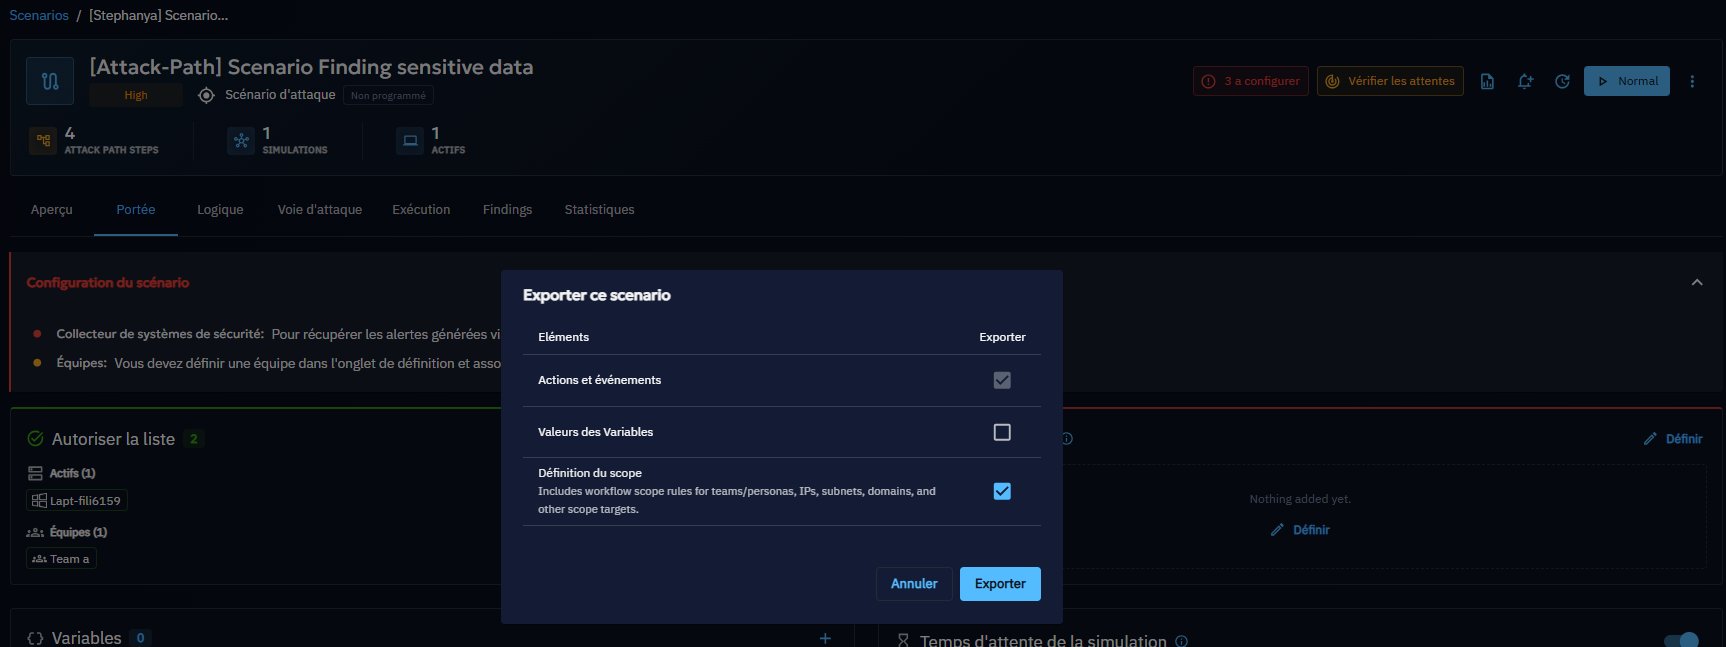
See Scope Definition for the full reference on what the chained scope includes.
3. Define the scope
Before building your logic, restrict which Assets the chained run is allowed to touch.
- Open the Scope tab.
- Add targets — Assets, Asset groups, or manually entered/CSV-imported IPs, IP subnets, or hostnames — to the allow list (targets the run may use) and, optionally, to the deny list (targets it must never use — deny always wins).
- Optionally set a timeout (maximum total runtime) and a rate limit (maximum retry attempts per time window) to keep the run safe and bounded.
See Scope Definition for the full reference (Asset groups, CSV import, Variables, timeout and rate limit details).
4. Build the logic
- Open the Logic tab and click Add component.
- Add an Action: pick a Threat Arsenal action and configure its arguments. This is your first step (for example, an initial access attempt).
- Add an Event: define one or more conditions on the data that Action produces (its execution status, an Expectation result, or any output field), combined with AND/OR.
- Add the next Action(s) that the Event should trigger when its conditions are met.
- Repeat to build out your full attack graph.
The platform warns you inline if an Event references a field that no Action on the canvas currently produces, with a shortcut to add a compatible Action.
See Logic Creation for the full reference (Actions, Events, operators, and linking outputs between steps).
5. Launch and follow the run
- Launch the Scenario/Simulation as you would any other.
- Use the Execution tab to follow Injects live as they fire, complete, and produce results.
- Once Actions have run against your Assets, open the Attack path tab to visualize how the chain actually propagated across your Assets and to review the Findings it produced.
See Attack Path Map for details on both the live execution view and the resulting graph.
Once you can build a chained Logic graph by hand, you can go one step further with Autonomous Attack Chaining: instead of authoring every Action and Event yourself, you give an AI orchestrator an objective in plain language and it plans, executes, and adapts a full attack path on its own, live, against your authorized environment.
What happens to the chain on other actions
The usual Simulation actions also apply to a chained run:
- Pause: no new Action starts; running Actions finish and their outputs are kept.
- Reset: deletes the run and its Attack path, but keeps the Logic and Scope.
- Delete: also deletes the Logic, Scope and Attack path.
- Duplicate: the copy gets the Logic and Scope, not the past runs. It requires an Enterprise Edition license.
What's next?
- Scope Definition: allow/deny lists, Variables, timeout, and rate limit.
- Logic Creation: Actions, Events, conditions, and output linking.
- Attack Path Map: follow a chained run live, then read the resulting graph across your Assets.
- Autonomous Attack Chaining: let an AI orchestrator plan and drive a chained run for you.
- Inject chaining and transfer: the simpler, non-EE parent/child linking mechanism.