Notification Center
The Notification Center is where every Notification produced by your Triggers lands. It is reachable from the bell icon in the top navigation bar and has two tabs: Alerts, covered by this page, and Triggers, where you configure what you're notified about (see Triggers). This page details how to read, filter, and manage the Alerts tab.
What Is the Notification Center?
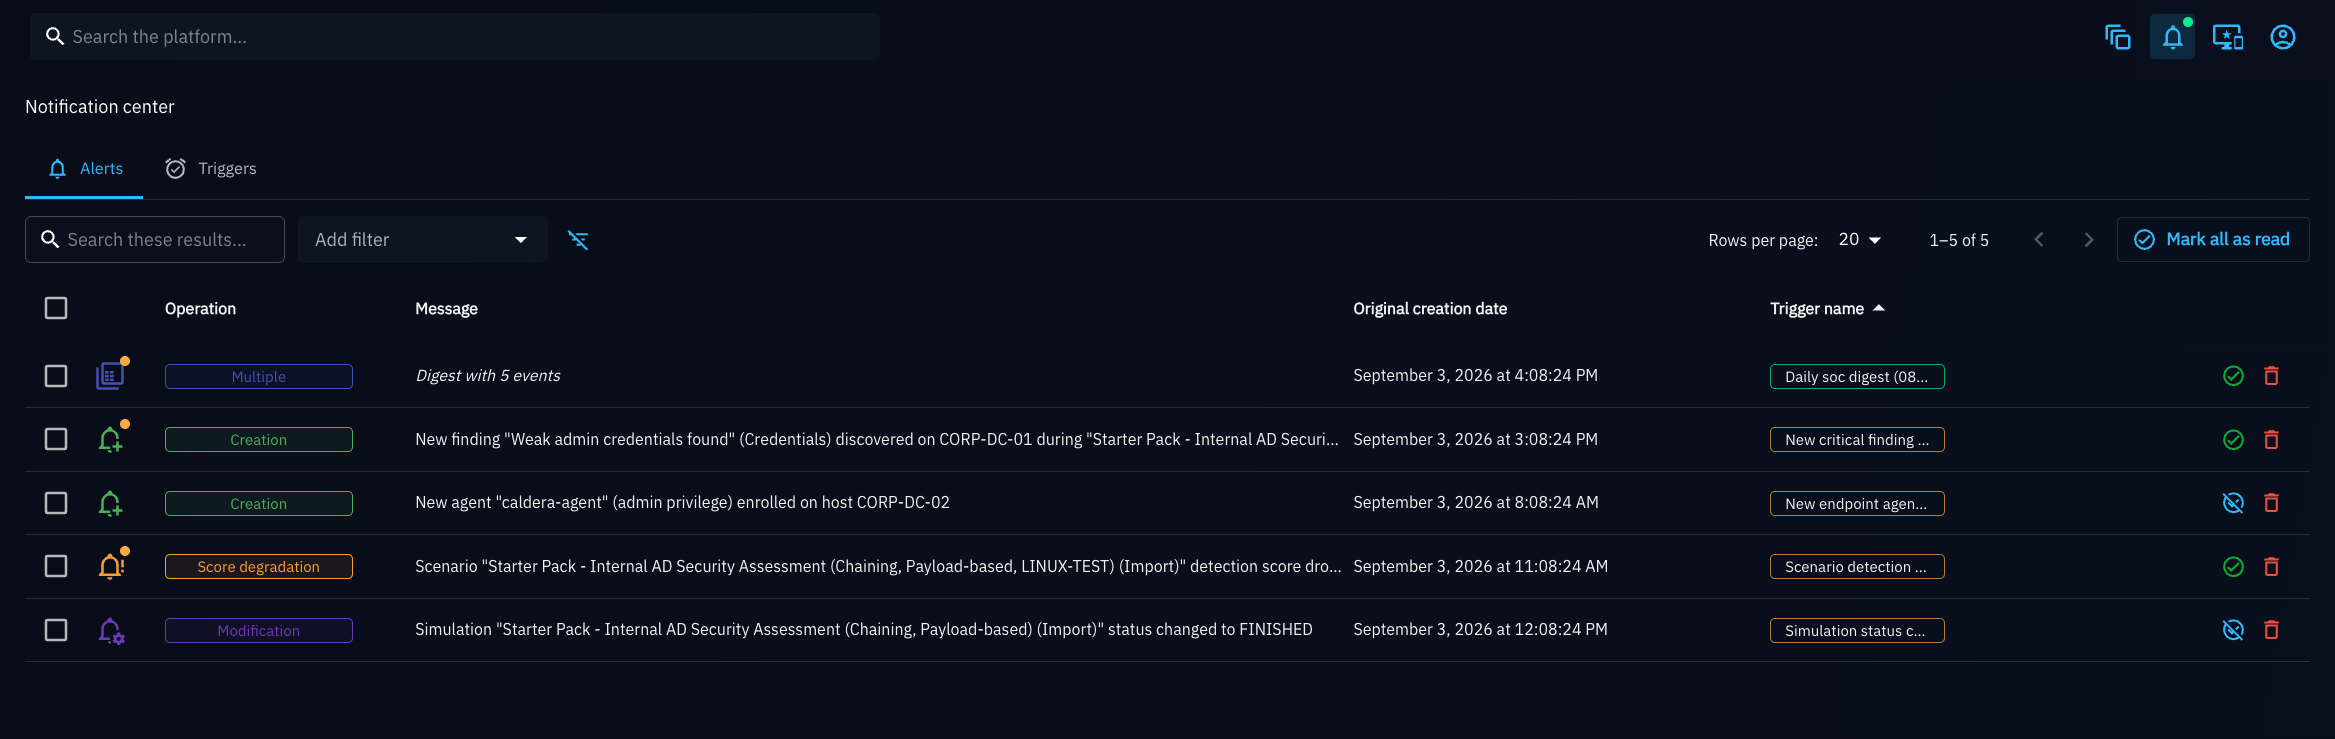
The Alerts tab is a personal, paginated list of every Notification you received. The bell shows a colored dot whenever you have at least one unread Notification, and stays highlighted while either tab of the Notification Center is open.
Each row in the list shows:
- Operation: a colored chip showing what happened: Creation, Modification, Deletion, Score degradation, or, for a Digest Notification, Multiple (several operations rolled up together). The row's icon mirrors the same operation with a distinct bell glyph, and an unread Notification shows an additional dot on that icon.
- Message: the human-readable description of the event. A Digest Notification instead shows how many events it bundles.
- Original creation date: when the underlying event actually happened, not when the Digest was sent.
- Trigger name: the name of the Trigger that produced the Notification, shown as a chip. Clicking it filters the list down to that Trigger's Notifications only.
Why Use It?
- Single place to review every alert: instead of checking every Trigger's target individually, review everything in one paginated, searchable list.
- Jump straight to what changed: a Live Notification links directly to the entity that triggered it, so you can investigate immediately.
- Clean up as you go: mark Notifications as read individually or in bulk, and delete the ones you no longer need.
How Do I Do It?
Review a Notification
- Click the bell icon in the top navigation bar to open the Notification Center's Alerts tab.
- Click a Live Notification's row to open the entity that produced it in a new context, for example, the Scenario whose score degraded, or the Asset that was created. A Notification is not navigable when its Operation is Deletion (the entity no longer exists) or when its Resource type has no dedicated detail page (Payload, Vulnerability, Document, Challenge).
- Click a Digest Notification's row to open a dialog listing every composed Trigger group and the events it matched. Any event pointing to an entity that still exists is itself clickable, and closes the dialog before navigating.
Manage Notifications
- Use the Operation, Message, Trigger name, or Read status to search and filter the list.
- Click the read/unread icon on a row to toggle that single Notification, or click Mark all as read in the top bar to clear every unread Notification at once.
- Select one or more rows with their checkbox (or select all) to reveal a bulk toolbar: Mark as read, Mark as unread, or delete the selection.
- Click the delete icon on a row to remove that single Notification.
Example: Investigating a Score Degradation Alert
- The bell icon shows an unread dot. Open the Notification Center's Alerts tab.
- The top row shows an orange Score degradation chip, with the message naming the Scenario and the drop in score.
- Click the row to open the Scenario directly, review the latest Simulation run, and start investigating the regression.
- Back in the Notification Center, click the row's read icon to mark it as read, or select it along with older, already-handled score alerts and delete them in bulk.
What's Next?
- Triggers -- Configure what Notifications you receive, and how
- Notifications & Triggers overview -- Back to the feature hub